The Edit Tab lets you adjust all slot-related values.
Remember that all changes here will affect all child slots that belong to the edited parent slot (apart from the settings that affect patch slots exclusively, like the Humanize Settings and of course the exclusive Patch Slot Options).
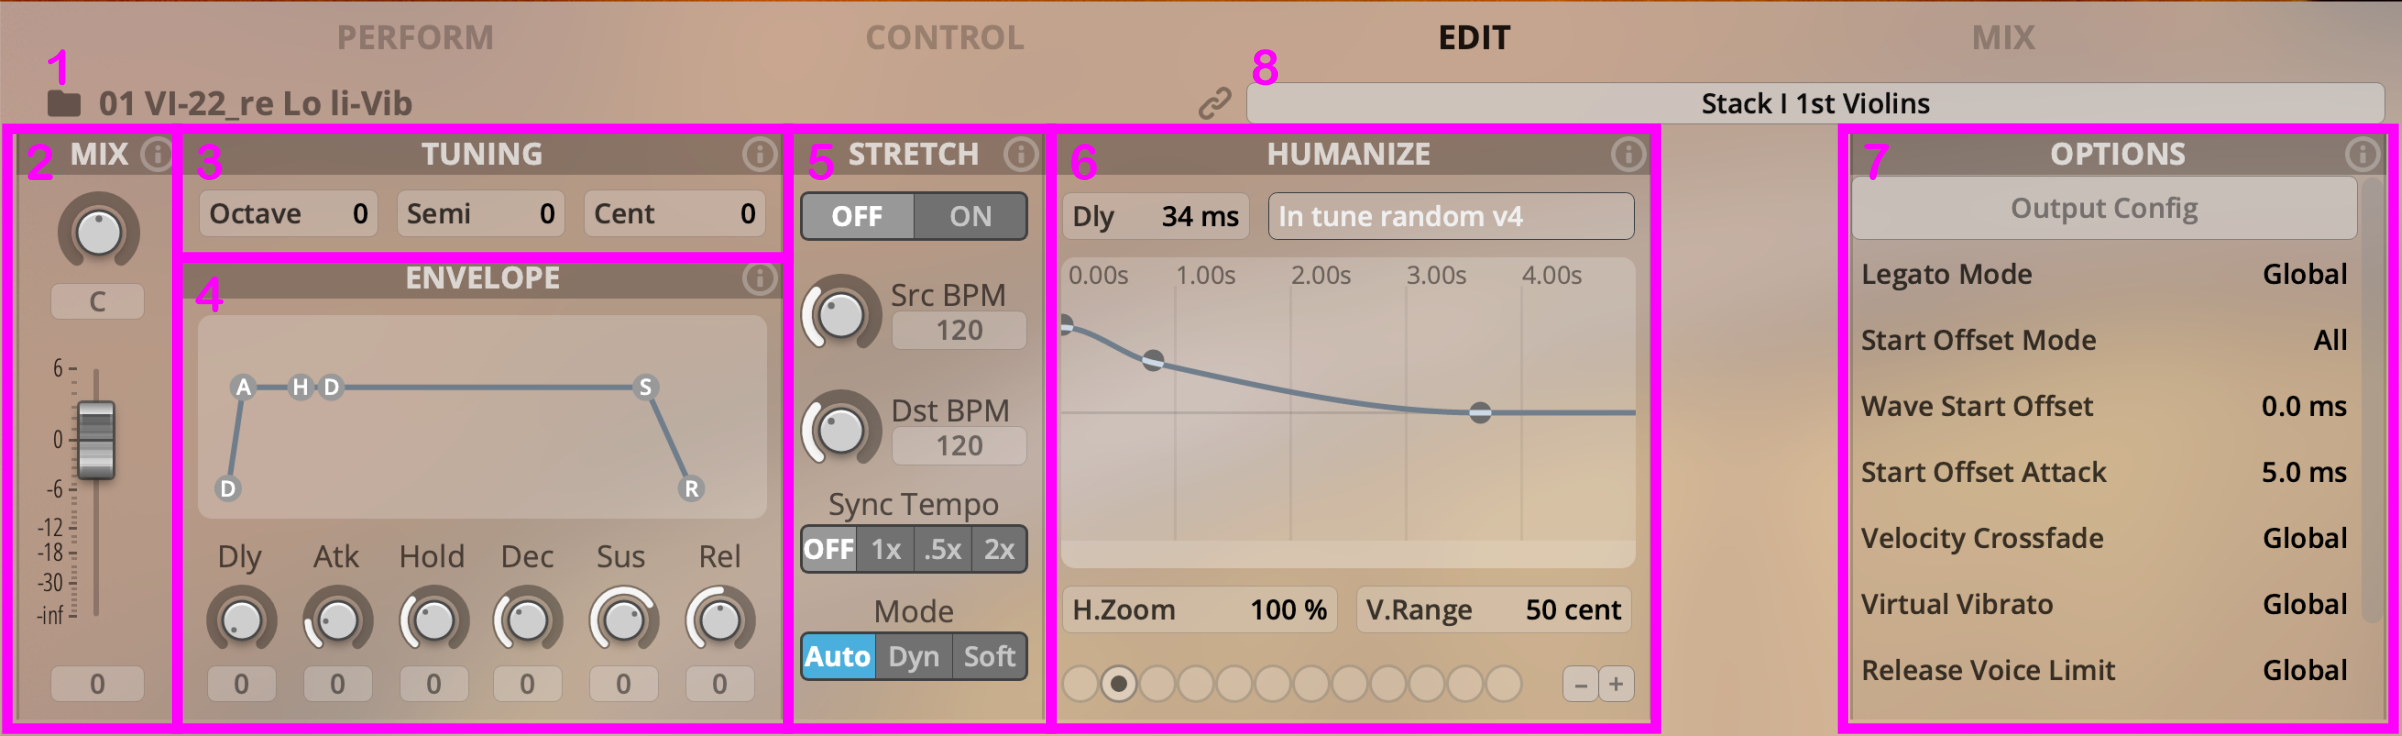
Loaded patch (Patch Slot only): Name of the loaded Patch.
MIX Section: Affects slot volume and slot balance.
TUNING Section: Transpose the selected slot.
ENVELOPE Section: Adjust the envelope of the selected slot
STRETCH Section: Real-Time Time-Stretching
HUMANIZE Section: Control the intensity of the Humanize effect quite comfortably. The two controllers HUMANIZE DELAY SCALE Scaler and HUMANIZE TUNING are available in your CONTROL Tab and can be scaled with the higher-level HUMANIZE AMOUNT Controller.
OPTIONS Section: Additional parameters. More options are available if a patch slot is selected.
Group Edit: Group slots by name. Every control will be linked in slots that share the same group name (automatically created from the dimension name / Slot name). You can also add custom groups.
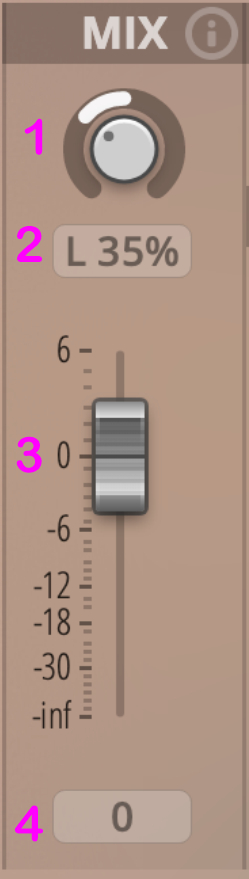
Slot balance: Position the sound of the selected slot
Balance display: Shows the balance value in detail.
Slot volume: Adjust the volume of the selected slot.
Slot volume display: Shows the exact volume.

Slot Transpose Octave: Slot transposition in octave steps.
Slot Transpose Semitone: Slot transposition in half-tone steps.
Slot Transpose Cents: Slot transposition in cents.
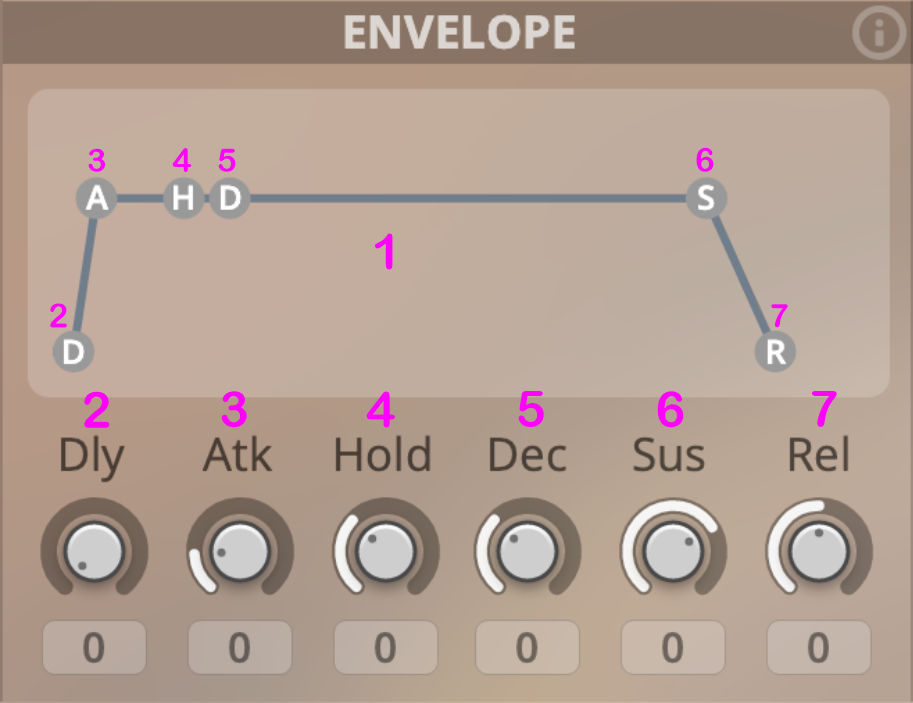
Envelope Curve: Displays the envelope that is applied to the selected slot.
Delay: Delays the starting point of the articulation of the selected slot. Higher settings will mute the sample part until the envelope attack sets in.
Attack: Affects the attack (fade in) of the patch. The higher the setting, the longer the fade-in.
Hold: Affects the hold time of the patch. The higher the setting, the longer the note will be held at full level.
Decay: Changes the decay time of the patch. The decay time begins when the hold time ends and fades to the sustain level. This value is scalable with the Humanize Delay Scale Slider in your Perform Tab.
Sustain: Changes the sustain level of the patch. That's the level that will be reached after decay time.
Release: Reduces or extends the release time of the patch. Higher settings result in longer fade-outs. Click-drag to change, Shift-drag to fine-tune,
Ctrl/Cmd-click to reset., and double-click to edit.
The Time-stretching feature adds the possibility to stretch samples in real-time. You can sync riffs, runs, repetitions and more to your music. Or use it for sound-design and to sculpt your own sounds.
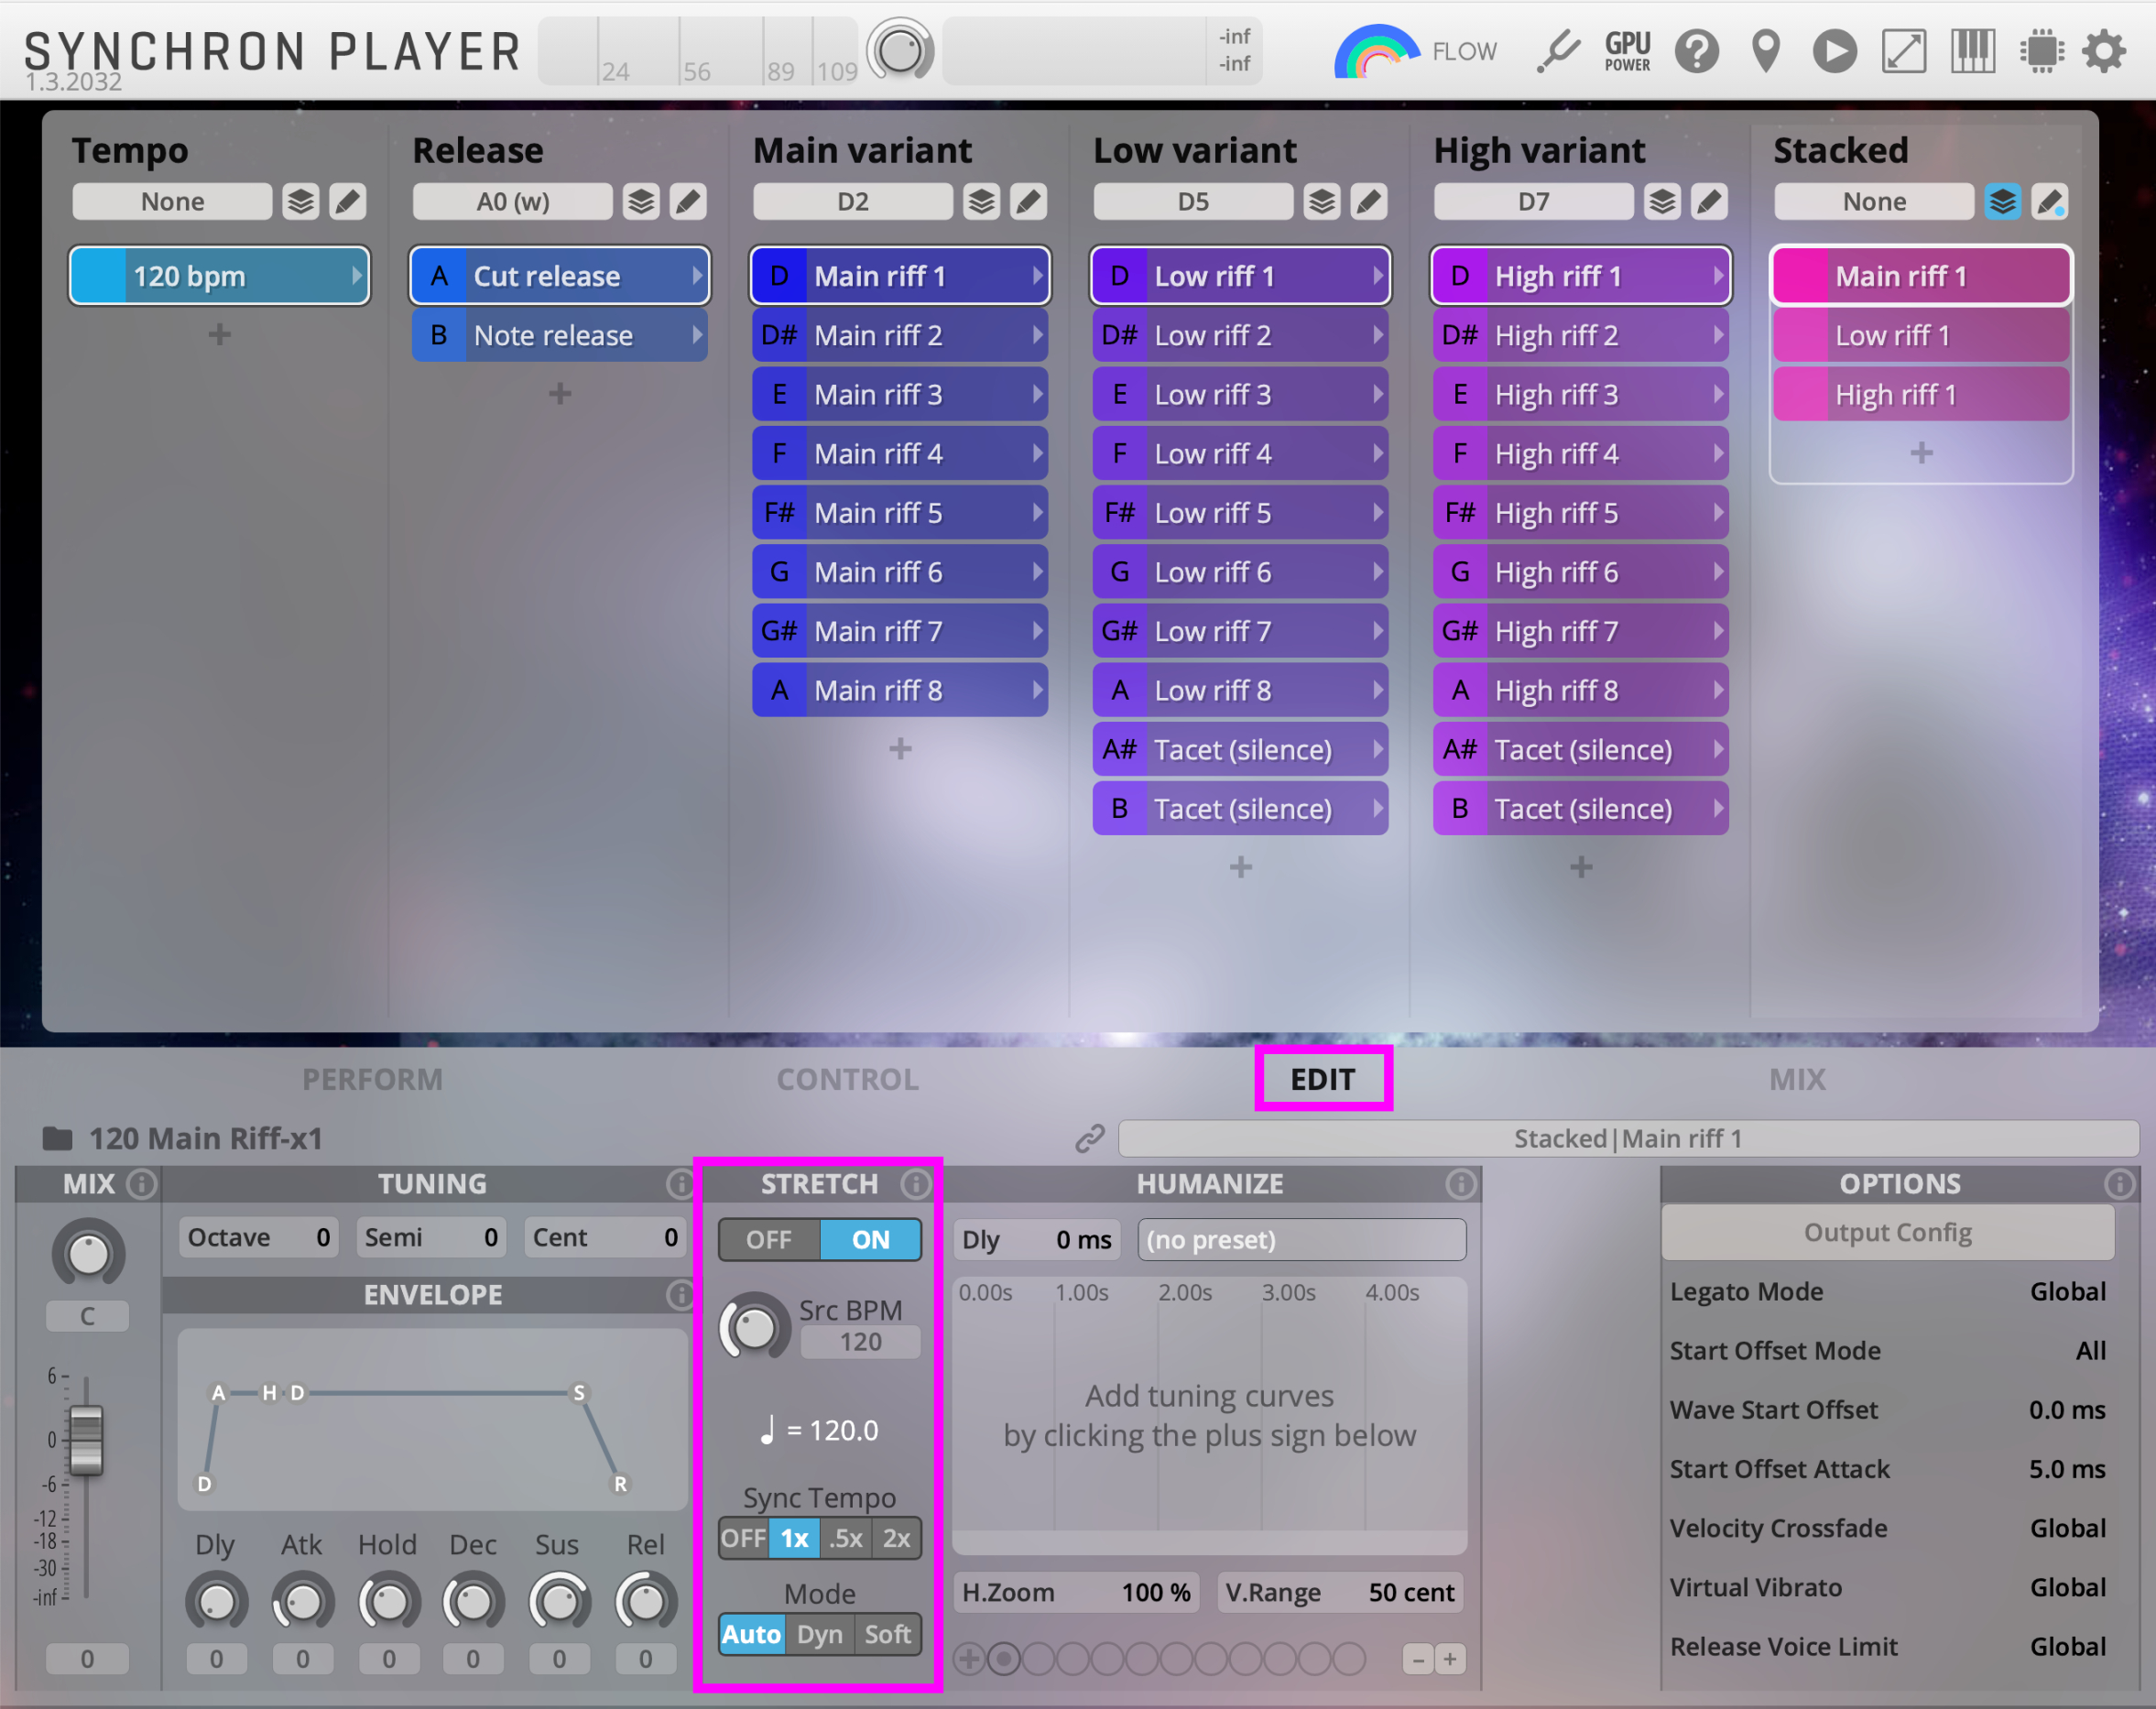
Enable the stretching by choosing a slot and pressing "ON" in the Stretch section in the EDIT Tab. Stretching will be enabled for the selected slot, as well as all child nodes. When changing the settings of a parent node, it overrides the settings of the child nodes.
Warning
Enabling stretching will greatly increase the preload size for these articulations. Make sure you have enough system memory available.
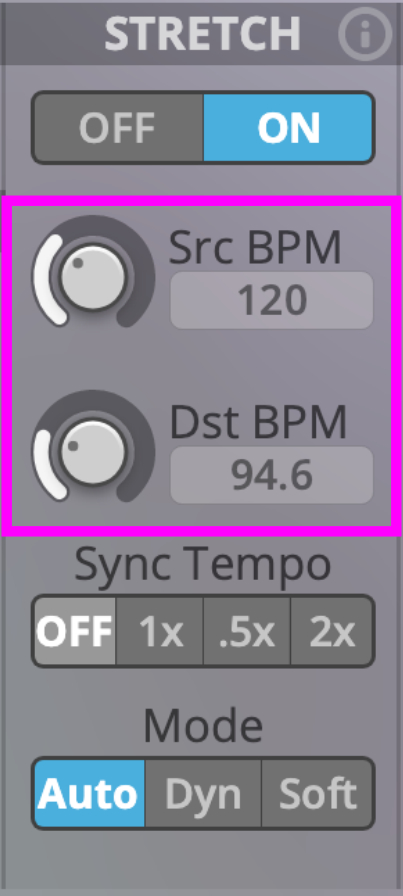
Set the Source and Destination Tempo in BPM here. Source Tempo can only be set for patches, not for a node with children.
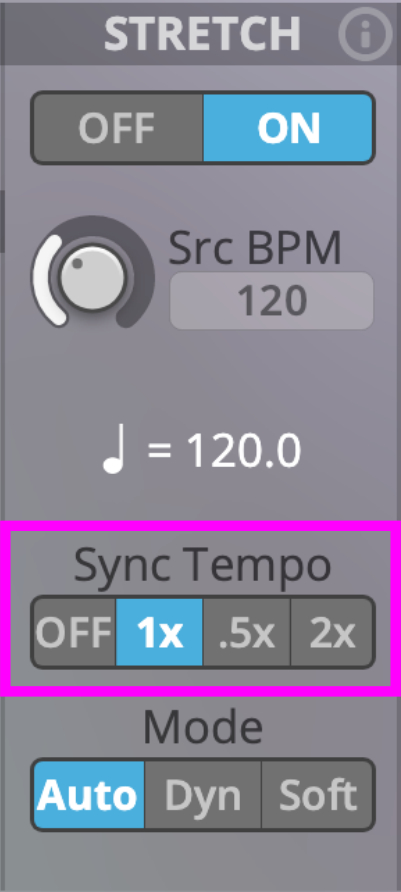
When this option is enabled, time-stretching will be synchronized with your DAW's tempo. Tempo changes will also change the currently played notes.
You have four options here:
OFF: Disables DAW Tempo Synchronization
1x: The Tempo of the DAW is used as the Destination tempo
.5x: The Destination Tempo is half the DAW tempo
2x: The Destination Tempo is double the DAW tempo
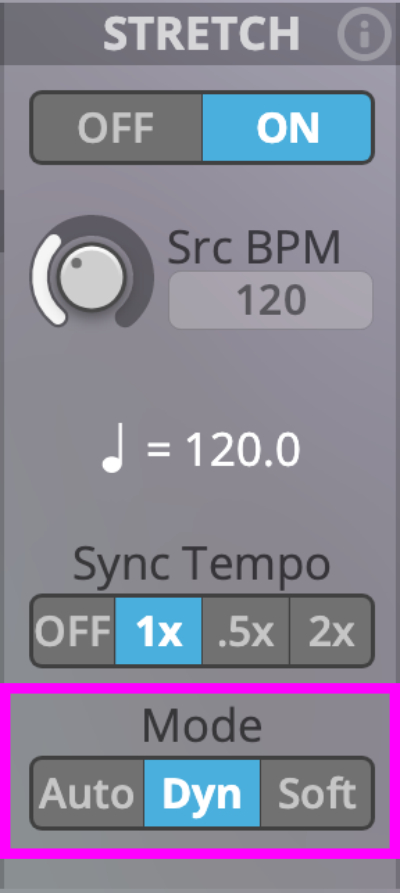
There are 3 modes available for time-stretching:
Auto: This is the default setting and will provide the best stretching results in most cases
Dyn: Use this if the Auto option does not provide the desired results for non-percussive, sustained sounds like dynamics or falls
Soft: Use this option with percussive or repetitive sounds for softer transients
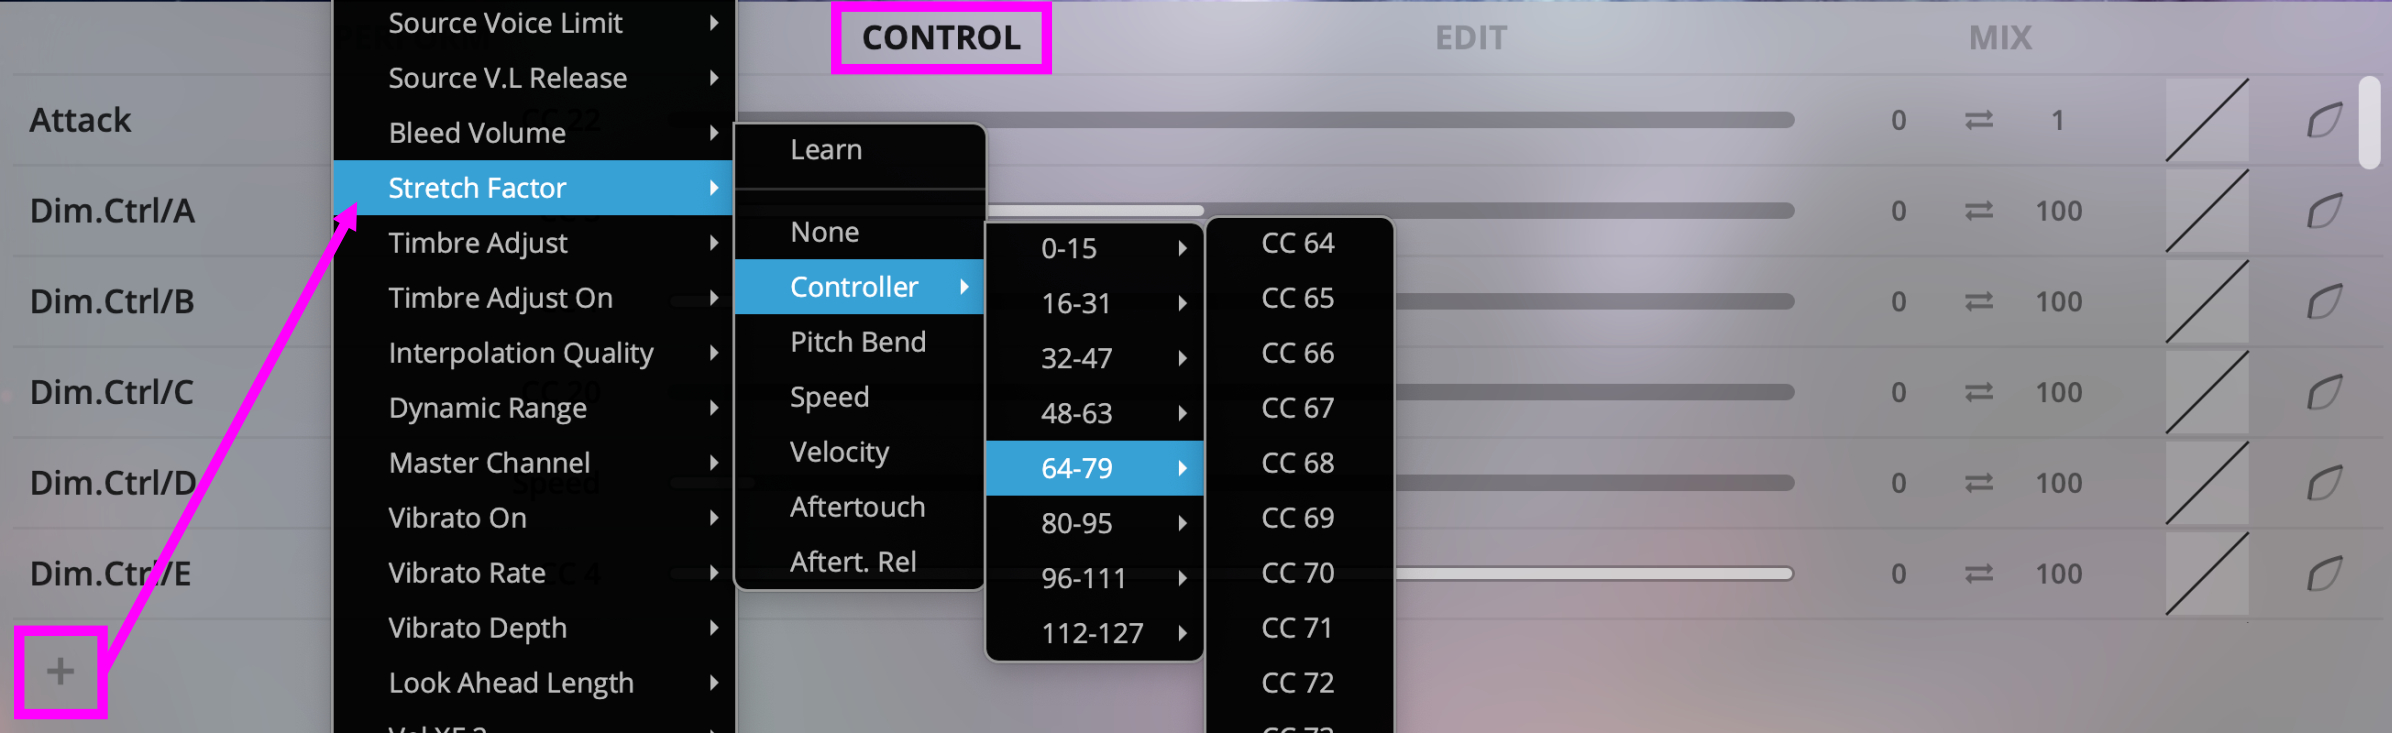
Add any of the available control sources to the last entry in the Controller list in the CONTROL tab of your Synchron Player. This is a great way to automate the amount of stretching you want to apply to your articulations. Apply in real-time to speed up or slow down articulations, or to make short notes even shorter whenever needed.
You will also find a Stretch control fader (assigned to MIDI CC 34) in the PERFORM tab.
For performance reasons, the used algorithm is not phase-locked. This can lead to phasing issues when using multiple microphone positions at the same time.
Note
If you experience these kind of issues, try altering the settings or reduce the number of used microphones.
Real-time stretching can have a huge impact on your CPU. This can lead to dropouts and audio artifacts.
If you experience these kinds of issues, try the following:
If you are using multiple voices at once, try to split them up into different Synchron Player instances
If you are using multi-microphone libraries, try to reduce the number of used microphones
Increase the audio buffer size
Use your DAW's freeze or in-place rendering functions
For technical reason, time-stretching currently is not applicable to legato articulation (in a musically correct way).
Enabling stretching will hugely increase the preload size and therefore the system memory usage. Make sure to have enough memory available before activating this feature.
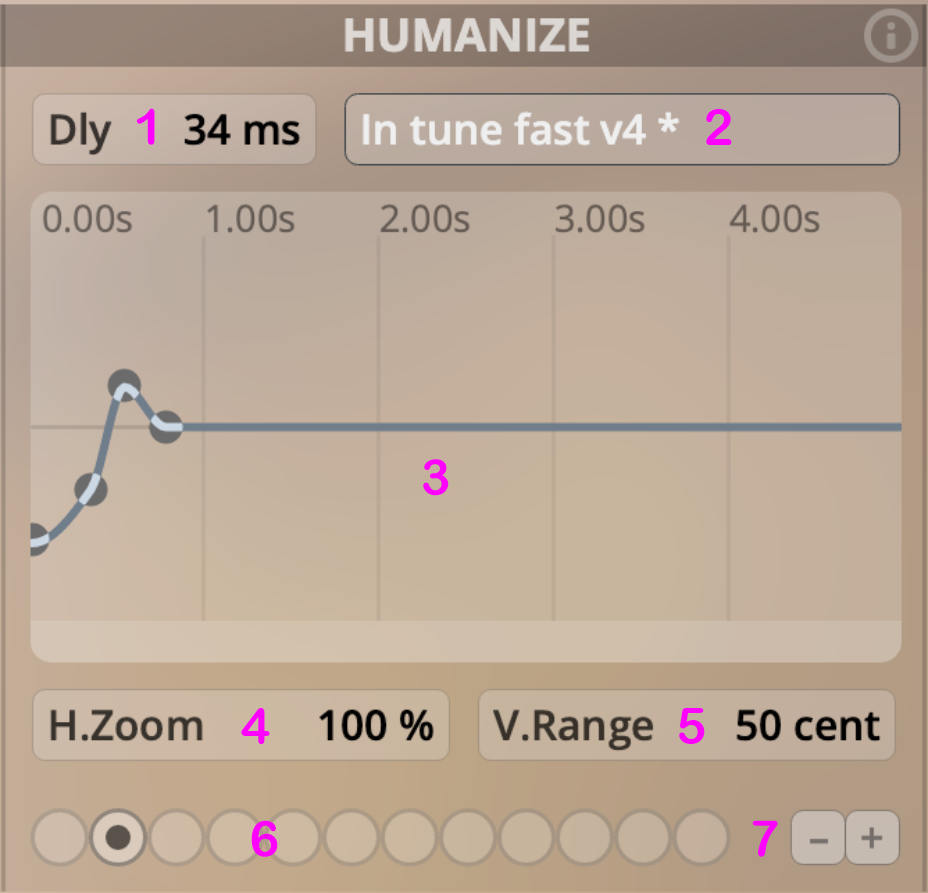
Delay: Sets a note-on delay for the currently selected Humanize index in milliseconds.
Humanize Preset Menu: Loads all settings for the Humanize Area. Choose from available Humanize Presets and load/save more presets from disk. Customized Presets are stored in the following locations by default.
macOS:\Your_Username/Documents\VSL\Vienna Synchron Player\Humanize Presets
WIN:C:\Documents and Settings\All Users\Documents\VSL\Vienna Synchron Player/Humanize PresetsTuning Curve Window: Double-click to add a tuning point. Click and drag the point to adjust its setting. Click and drag in the curve window to create a multi-selection rubber band. Command-Click (WIN: Control-Click) on selected point(s) to delete.
Horizontal Zoom: Sets horizontal zoom of the tuning curve.
Vertical Range: Sets vertical display range of the tuning curve, in cent.
Humanize Index: Shows the number of available humanize steps for each preset.
+/-: Add or subtract positions in the Humanize Index.
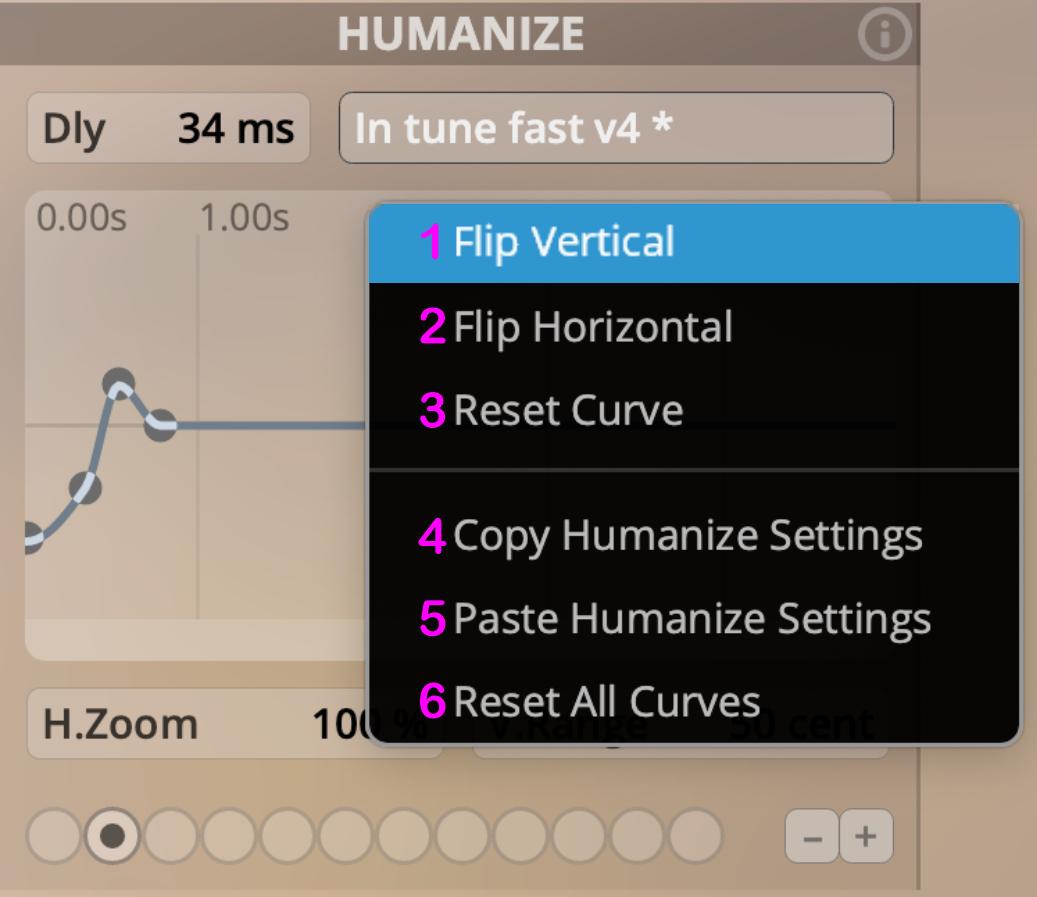
Flip Vertical: Inverts tuning curve vertically.
Flip Horizontal: Inverts tuning curve horizontally.
Reset Curve: Resets all points of the selected humanize preset to zero.
Copy Humanize Settings: Copies all Humanize Settings (including delay values).
Paste Humanize Settings: Paste all Humanize Settings (including delay values).
Reset All Curves: Resets Humanize to no selected preset.
When a folder slot is selected, the options pane will only show Performance Release, which defines the release time for samples played in Performance Repetition mode. For patch slots, there are more options.
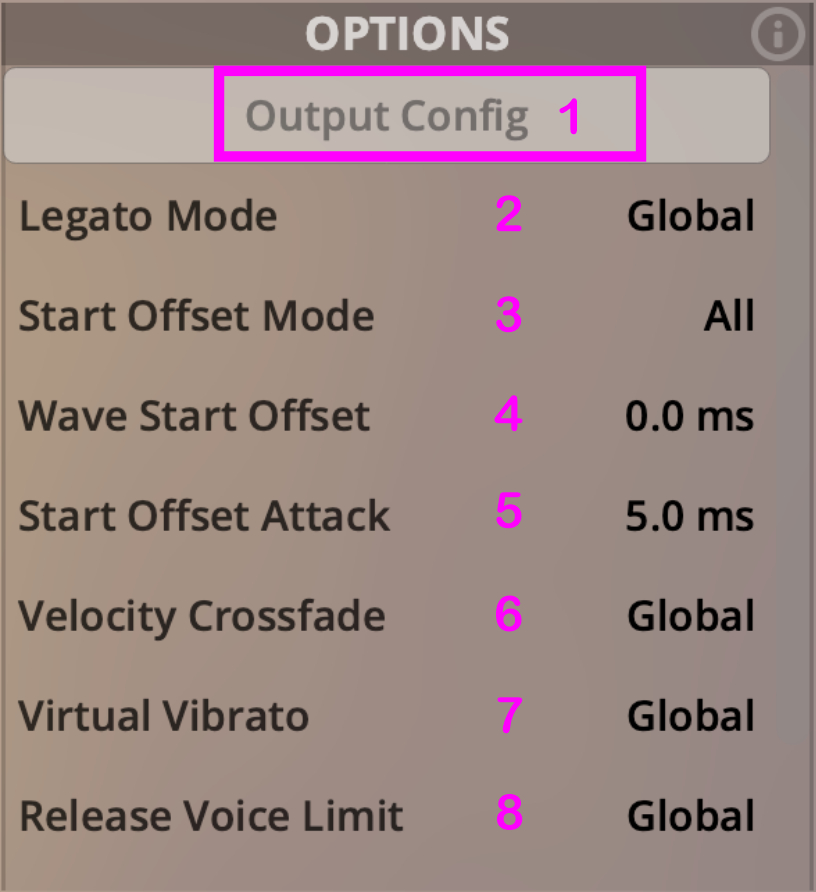
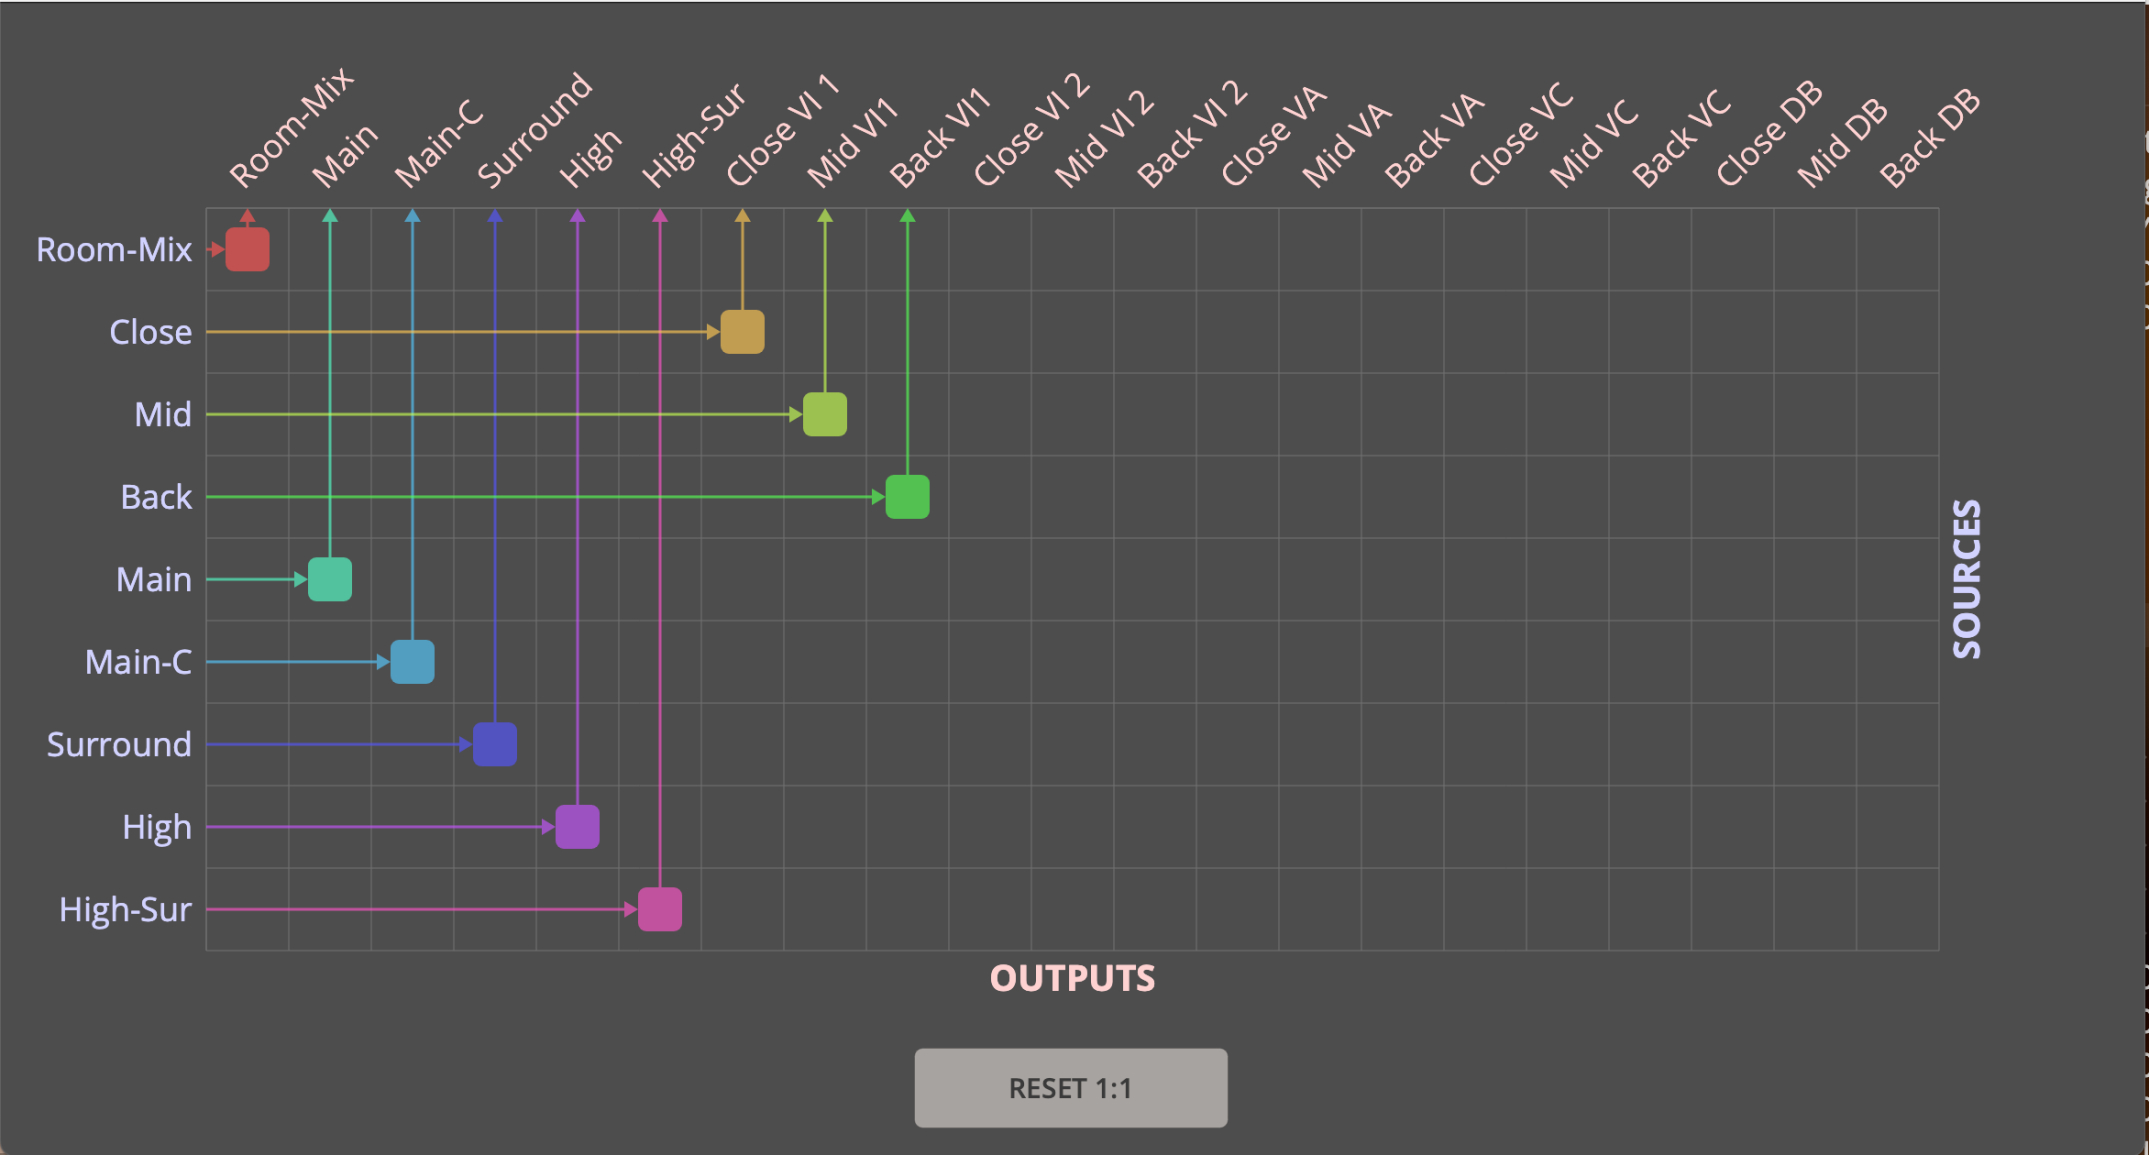
Output Config: Opens a matrix that lets you assign the available sources to all available mixer output channels. The option is only available for patches with multiple microphones (see image below). Others, such as our Studio collections, will show a Mixer Output selection where you can specify the mixer channel the patch will be played in.
Legato Mode: Usually set to the global Legato Setting, you can also choose to have monophonic or polyphonic legato applied to the selected slot. Off allows the slot to be unaffected by the legato logic so that you can layer legato slots with non-legato slots without side effects. We have taken care of these settings in the factory presets for you.
Start Offset Mode: Sets which samples should be affected by the Wave Start Offset parameter (below). Options: All, First, Repetition, Legato, Repetition-Legato.
Wave Start Offset: Sets the start offset in milliseconds. Any value above 0 will skip the corresponding first part of the played sample. Range: 0-1 sec.
Start Offset Attack: Creates a fade-in (in ms) in case Wave Start Offset is applied, to avoid clicks. Range: 5-100 ms
Velocity XFade: Move dynamically between velocity layers. Usually set to global, following the global Velocity XFade setting on the Perform tab, where it can be activated or deactivated with the power button next to the fader. In the Edit tab, You can choose to turn it ON or OFF individually for the selected slot. Options: Global / On / Off.
Virtual Vibrato: This option adds an artifical vibrato to the patches, and has the same options as Velocity XFade.
Attention: a controller for virtual vibrato should be assigned in the Control tab, where you can define controllers for rate, depth, and switching virtual vibrato on and off.Release Voice Limit: Adjusts the maximum of simultaneously playing Release Samples. Choose between the global setting, defined in the Perform Tab, or slot-specific Release Samples (maximum= 32). Drag or double-click the value to change. In order to ensure minimal audible effects, the first played release samples will be muted if the limit is exceeded.
Output Config