Apart from its extensive audio features, Vienna Ensemble Pro 8V also integrates VSL’s new Vienna Video Pro plugin, enabling you to insert video project channels, which you can use to synchronize music and film. Vienna Video Pro extends your setup with smooth, GPU-accelerated video streaming on remote machines, complete with timelines, markers, and flexible sync options. Whether you’re working on a single system or across complex multi-computer studios, Vienna Ensemble Pro 8V keeps your entire creative workflow perfectly in sync. Here are the specifications in a nutshell:
Stream video and audio playback directly through Vienna Ensemble Pro 8V (also from remote machines) to free up your DAW machine’s CPU
Fluid, GPU-accelerated performance with thumbnails and audio waveforms generated in real time.
Support for multiple timelines, each with its own frame rate.
Add streamers and markers directly within the timeline for precise scoring cues. Import markers from Cubase (drag the .xml file on the timeline).
Sync to host application or play independently in free render.
Convenient video export option – multiple resolutions and bitrates, H264 container, mp4. Keep working during export.
Load/save complete video projects within Video Pro.
Extremely low CPU impact – heavy processing is done on the GPU.
Option to delay video audio playback for perfect sync with the picture.
Timeline timecode offset support, including negative values for full compatibility with Cubase and other DAWs.
Blackmagic Design support.
MMC/MTC support.
Supports virtually all common video formats.
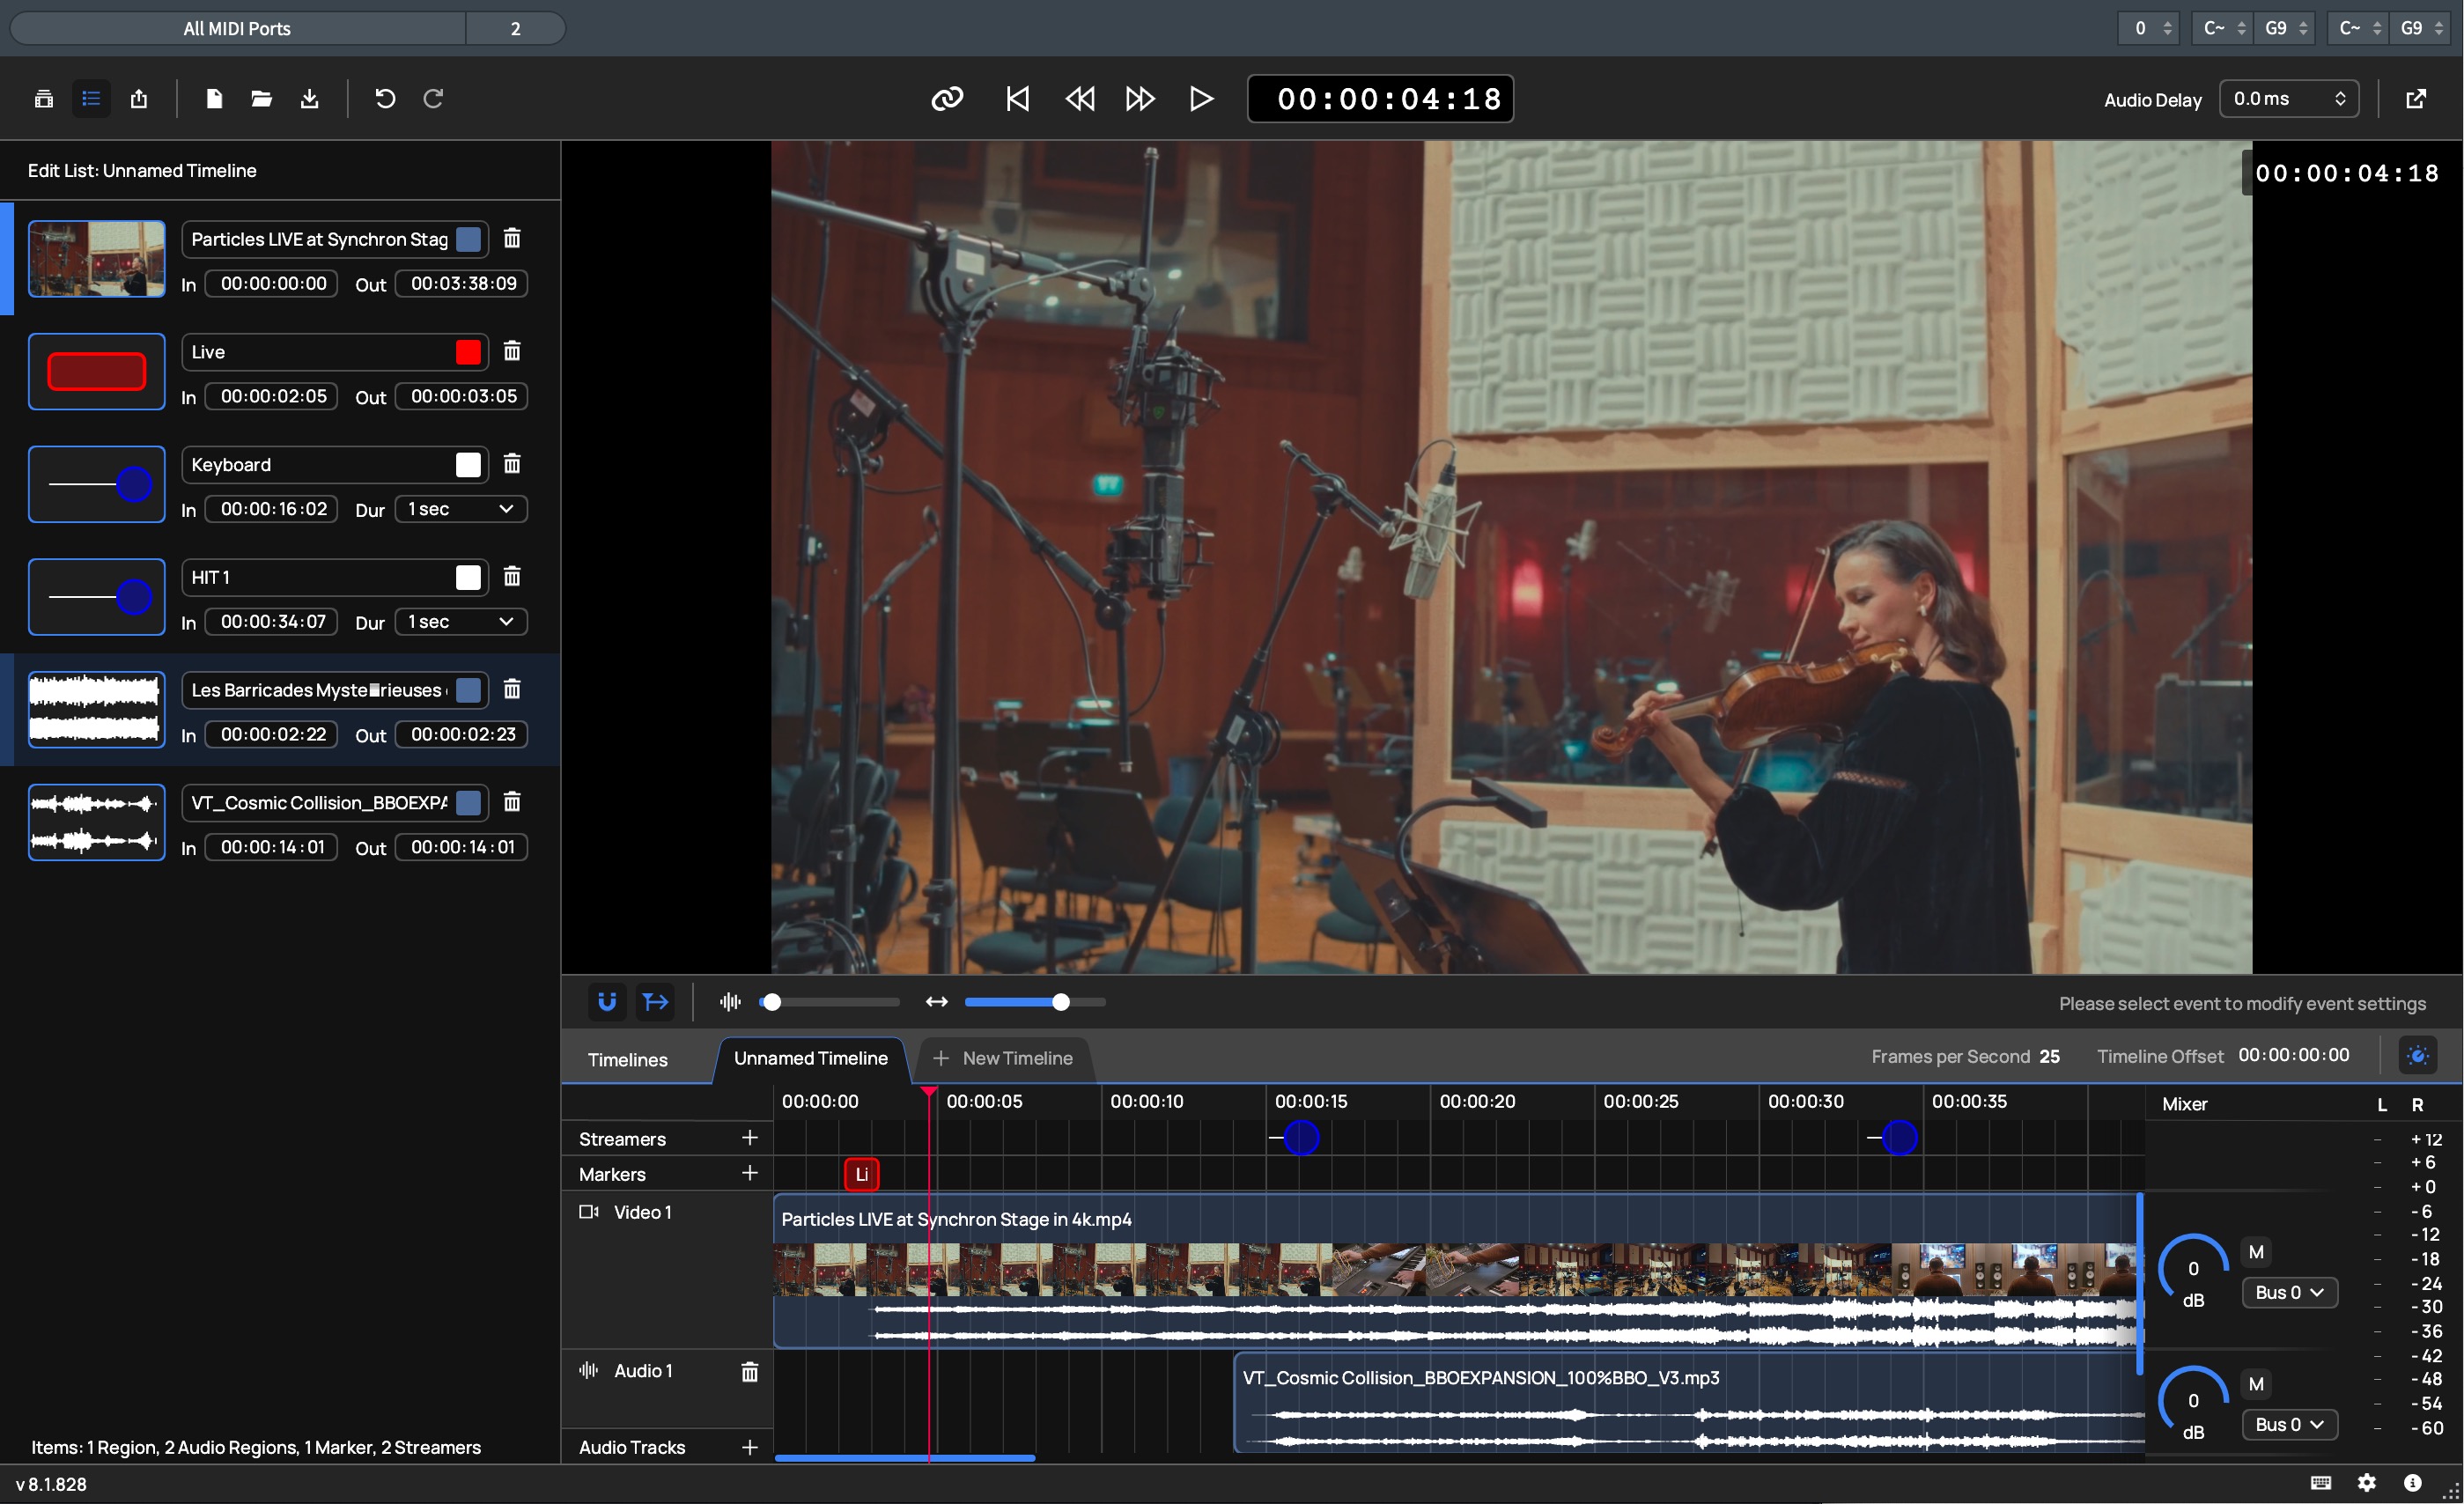
The video channel window will open detached from the main VE Pro window:
In the menu bar’s first group of options, you’ll find the display buttons for media, event list (including media), and the export button. In the second group, you can create, open, or save a video project (.vpro). Next to these options, you’ll also find the undo and redo buttons.

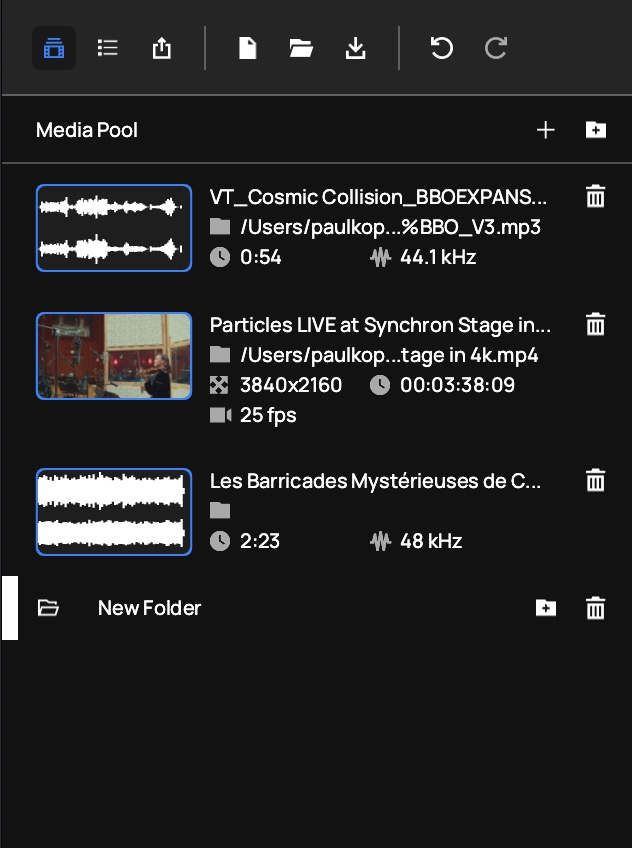
In the panel under the menu bar, media, events, or the export options are listed according to your selection.
The media pool shows a list of the project’s video clips with information about their resolution, duration, and framerate. In the upper right corner of the pane, you can add media and create folders by clicking on the respective symbol. In the list itself, click on a folder entry’s “add folder” icon to create a sub-folder. Click the bin symbol to remove items, i.e., folders and/or media.
List view shows the currently selected timeline’s regions (video files or parts thereof) as well as its markers and streamers in the order of their appearance. Media display their In and Out times. As streamers and markers have fixed lengths, their entries list In time and Duration.

Remove items from the timeline by clicking the bin icon. Click on the color fields to change the underlying color of media in the timeline, the text color of markers, and the color of streamers in the video display.
This pane hosts the project’s export options.

Output: enter a filename here or select an existing file by clicking on the folder icon on the right side of the name field.
From / to: defines the starting and ending time of the sequence to be rendered. Click Auto to return to the original values, i.e. the entire timeline sequence.
Size: select the video’s resolution from 16:9 to C4K.
Quality: set the rendering quality in four steps from low to very high.
Overlays: check if you want to include timecode, markers, or streamers in your rendered video.
Once you click the export button, the rendering progress is displayed below. Click “x” to cancel the process.

In the Video Pro window's lower right corner you can find the icons to display a list of shortcuts, open the basic settings pane (both these windows are scrollable), or display credits in the About window.
The upper section of the settings pane provides basic settings for your streamers and markers, and options for general software behavior.

Default streamer length: choose a value from 1 to 5 seconds.
Default marker length: choose a value from 1 to 5 seconds.
Mute audio from Video Pro plug-in in DAW exports: if this box is checked, the video will be rendered without its original sound. If you change this option, restart the host application to take effect.
Reset playhead when stopping playback: if checked, the playhead will return to its starting position.
The settings’ lower section contains the video options.

Overlays: basic settings for the inclusion of timecode, markers, and streamers in your rendered videos. Can also be set individually in the Export pane.
Timecode: the timecode can be inserted on top or bottom left/middle/right, and its background color can be changed for better visibility.
Marker position: markers also can be shown top or bottom left/middle/right
Decoding mode: set to hardware (default) or software. For the change to take effect, close the video window and reopen it.
Always keep Popout Window on Top: if activated, the video player display will stay on top. Here, too, if the Popout Window is open you'll have to close and reopen it to take effect.
MMC Output: defines an output for MIDI Machine Control (transport information being sent to your DAW)
MTC Input: defines an input for MIDI Time Control (time code being received from your DAW)
Connected Blackmagic devices: lists devices based on Blackmagic technology.
The timeline display shows the details of the selected timeline with its regions, streamers, and markers.
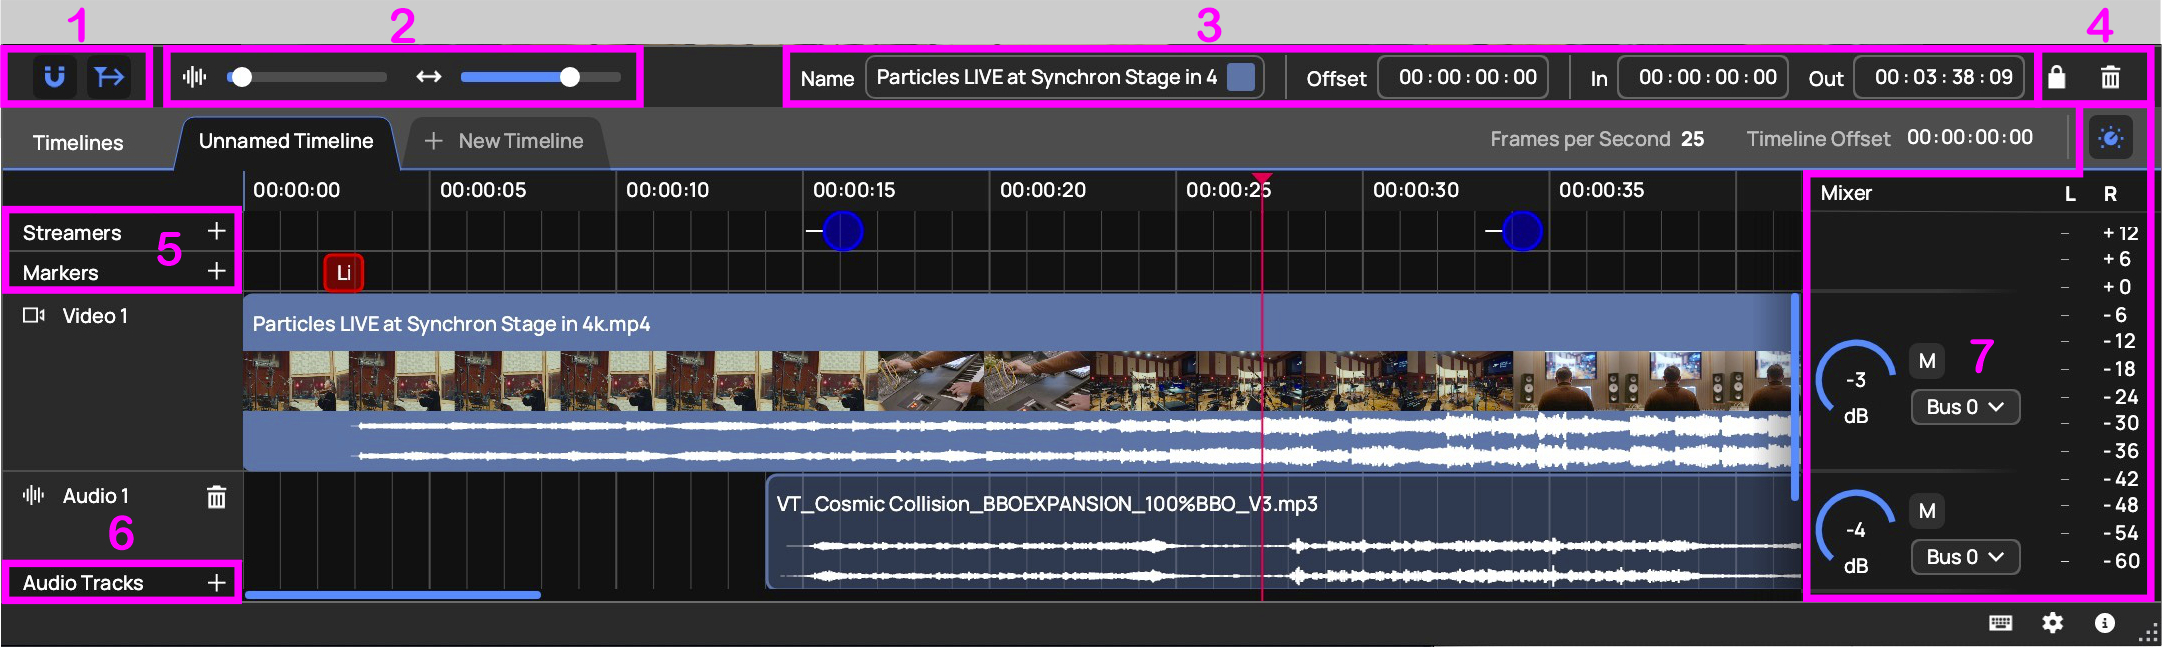
Activating snap to objects makes events in the timeline latch on to each other, follow playhead causes the timeline position to follow the playhead in the video window.
Zoom faders for audio (vertical) and timeline display (horizontal).
Click on the waveform icon to reset audio zoom, and the double arrow to fit all regions into the timeline display.The information area lists parameters pertaining to the selected region, streamer, or marker.
Lock fixates the selected object in its timeline position. Click the bin icon to remove an object from the timeline.
Add streamers and markers by clicking on the respective "+" sign.
Likewise, add audio tracks by clicking on the "+" sign.
The audio mixer allows you to set volume and output bus of individual audio tracks. Mute tracks by clicking the “M” button. Click the top icon to show/hide the mixer display. On the mixer’s right side, there is a volume meter.
Information about Media (video and audio files) lists their Name, Resolution, Source offset, and In and Out Points, as well as whether their region is locked or unlocked.
Streamer info lists their Name, Hit Point, and Duration. You can set a Streamer's duration to 6 lengths between 1 and 5 seconds, and you can also select colors for the Streamer itself and for the Hit Point.
Marker info shows a Marker's Name as well as In and Out Point. You can choose Marker and Text colors by clicking on the color dots.
The video player area shows the video resulting from the events in the timeline.

On the left side of the play area’s top bar, there is the Synch to Host button. When activated, the video will synchronize with your host application, i.e., follow the music. Deactivate if you want to work only on the video!
Next to that, the transport controls: Back to start (Home key), Rewind (Arrow left), Fast Forward (Arrow right), and Play (Space).
The Time display next to these shows where you are at the moment in your timeline. Depending on your settings, the timecode may also appear in the video screen.
On the right side, set Audio Delay in milliseconds by dragging with the mouse or double-clicking to enter a value.
Finally, there is the pop out video icon to open the player in a separate window.
To make the Space Bar and synchronisation work with your DAW from within the Video Pro plug-in, you need to use virtual MIDI ports to establish communication between the DAW and the video plugin.
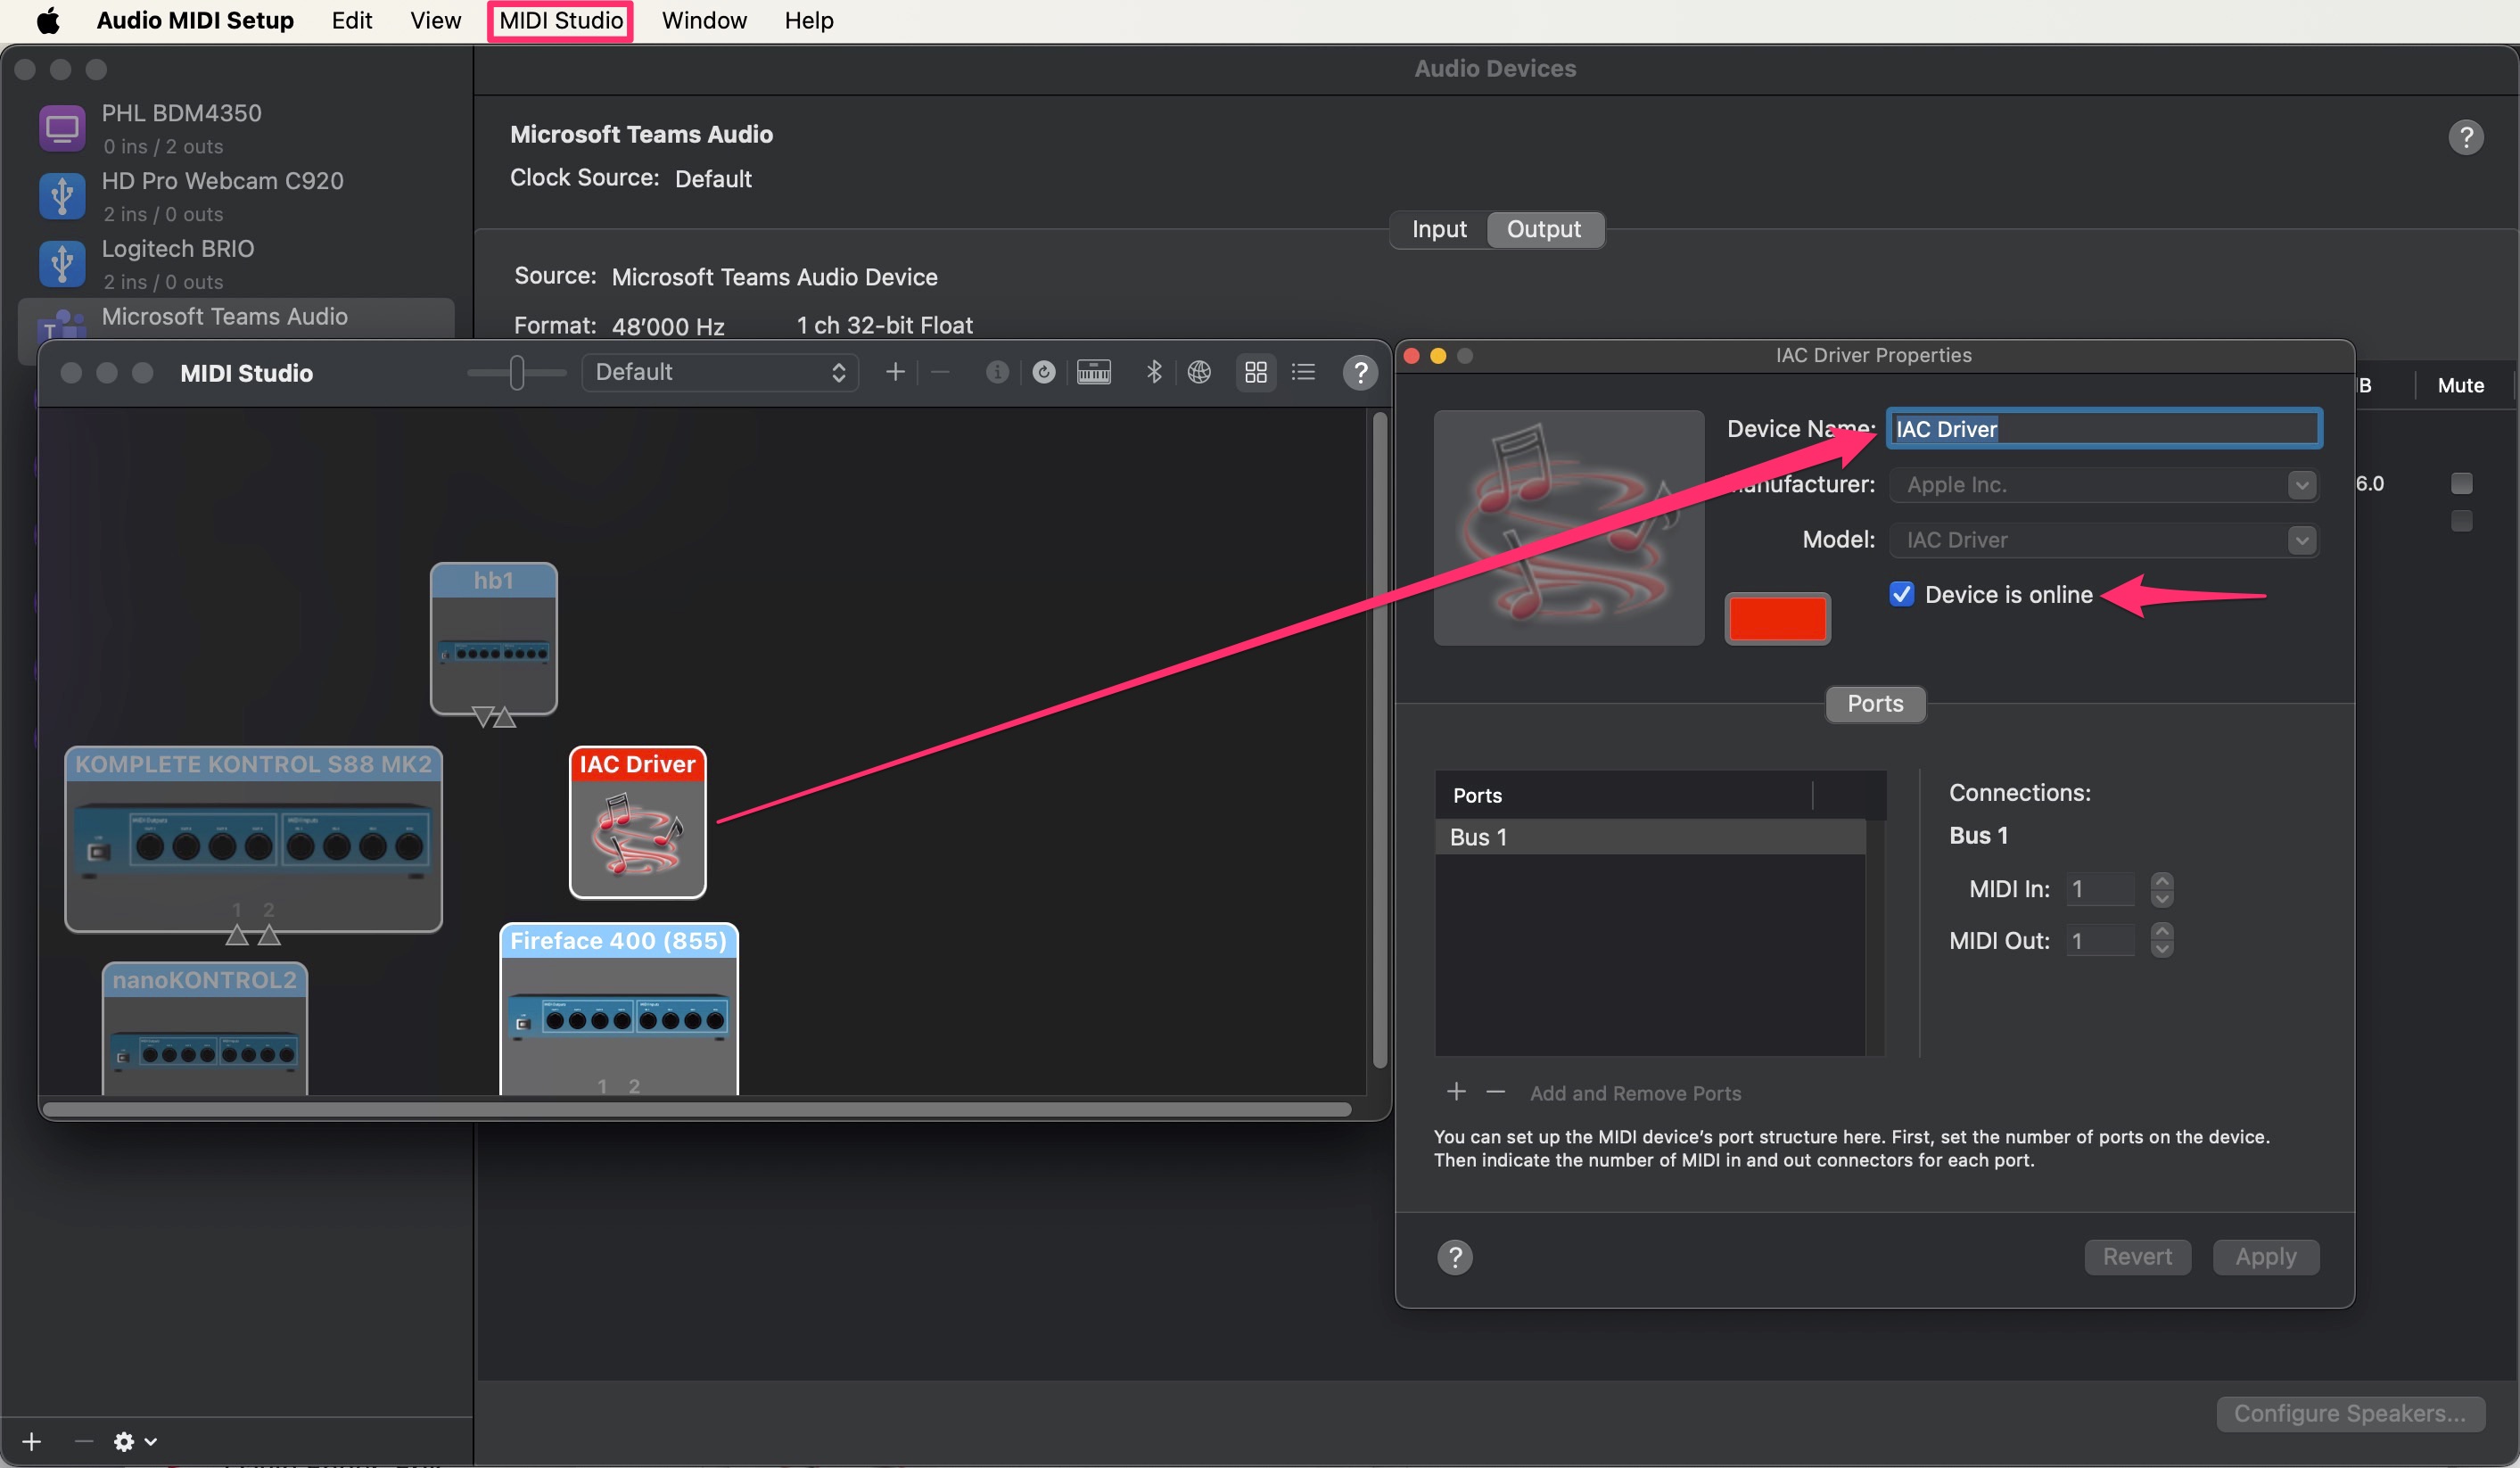
Mac uses the IAC Bus as a built-in MIDI port, which you can find in the app Audio MIDI Setup.
IAC stands for Inter Application Communication.
Launch Audio MIDI Setup > go to Window > Show MIDI Studio
In the MIDI Studio, select IAC Driver and set your Device name
Tick Device is online, and click the + button to add it to the list of Ports.

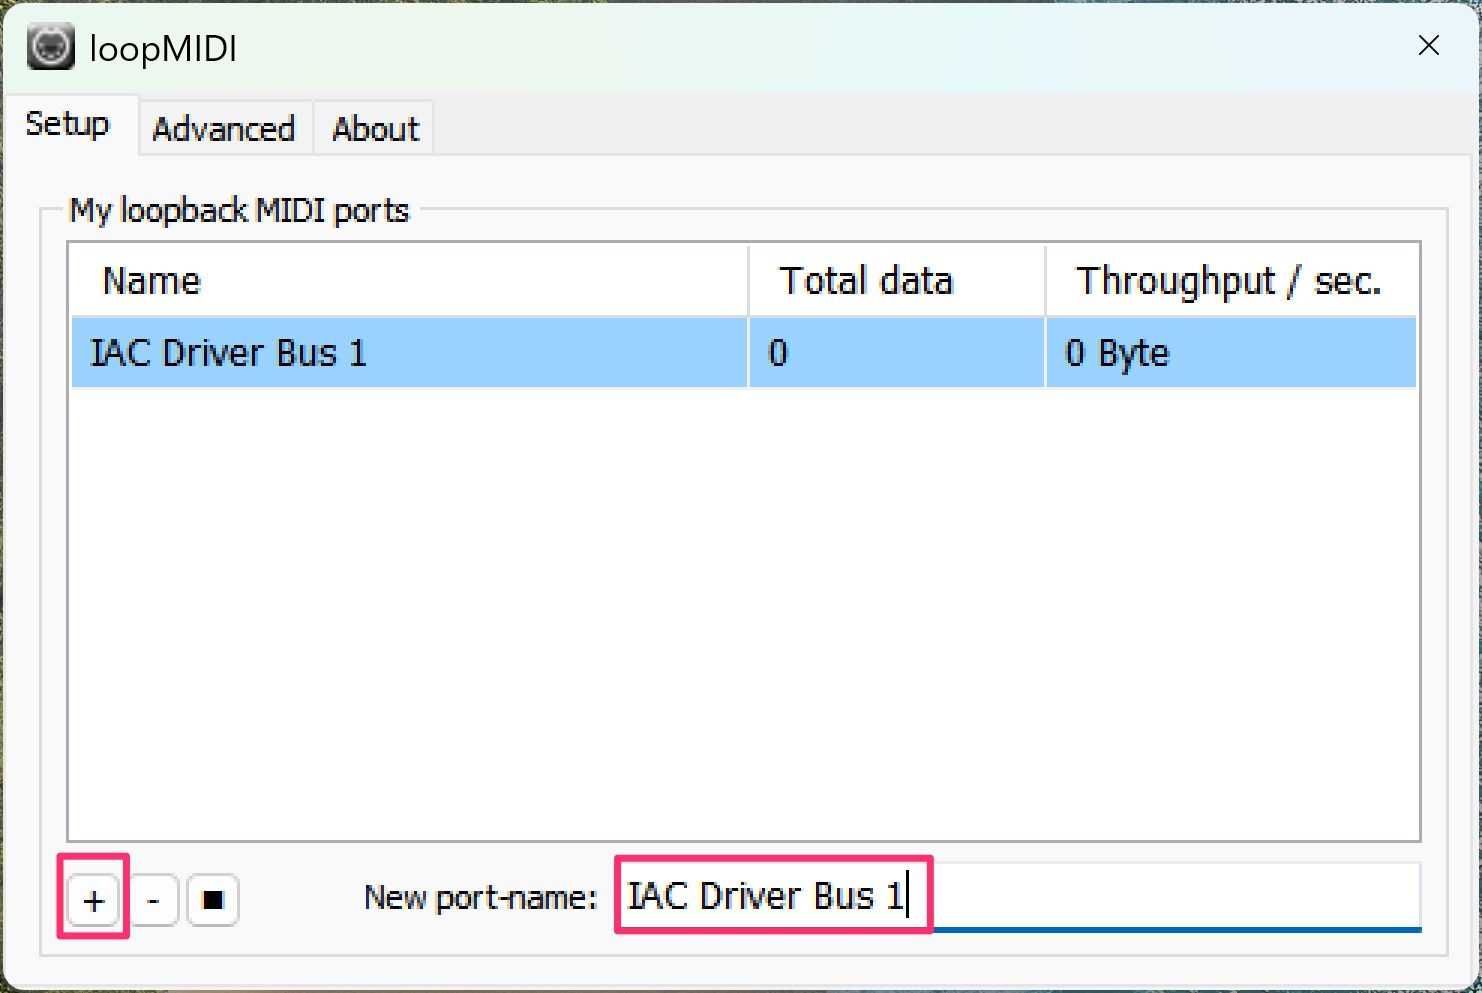
Windows doesn't have a built-in application for creating virtual MIDI ports, but you can use the free LoopMIDI software (click here to download).
Launch the LoopMIDI application
At the bottom, set your port name
Click the + button to add it to the list of Ports.
After setting up virtual MIDI ports on Mac or Windows, go to the Settings in your Video Pro Plug-in, and assign your created MIDI port as needed.

Finally, follow the chapters below for synchronization instructions specific to your DAW, right below.
In Logic Pro's Project Settings, under Synchronization / MIDI, make sure that "Listen to MIDI Machine Control (MMC) Input" is activated.
Also, select an IAC Driver Bus as a Destination and activate MTC (MIDI Time Control).
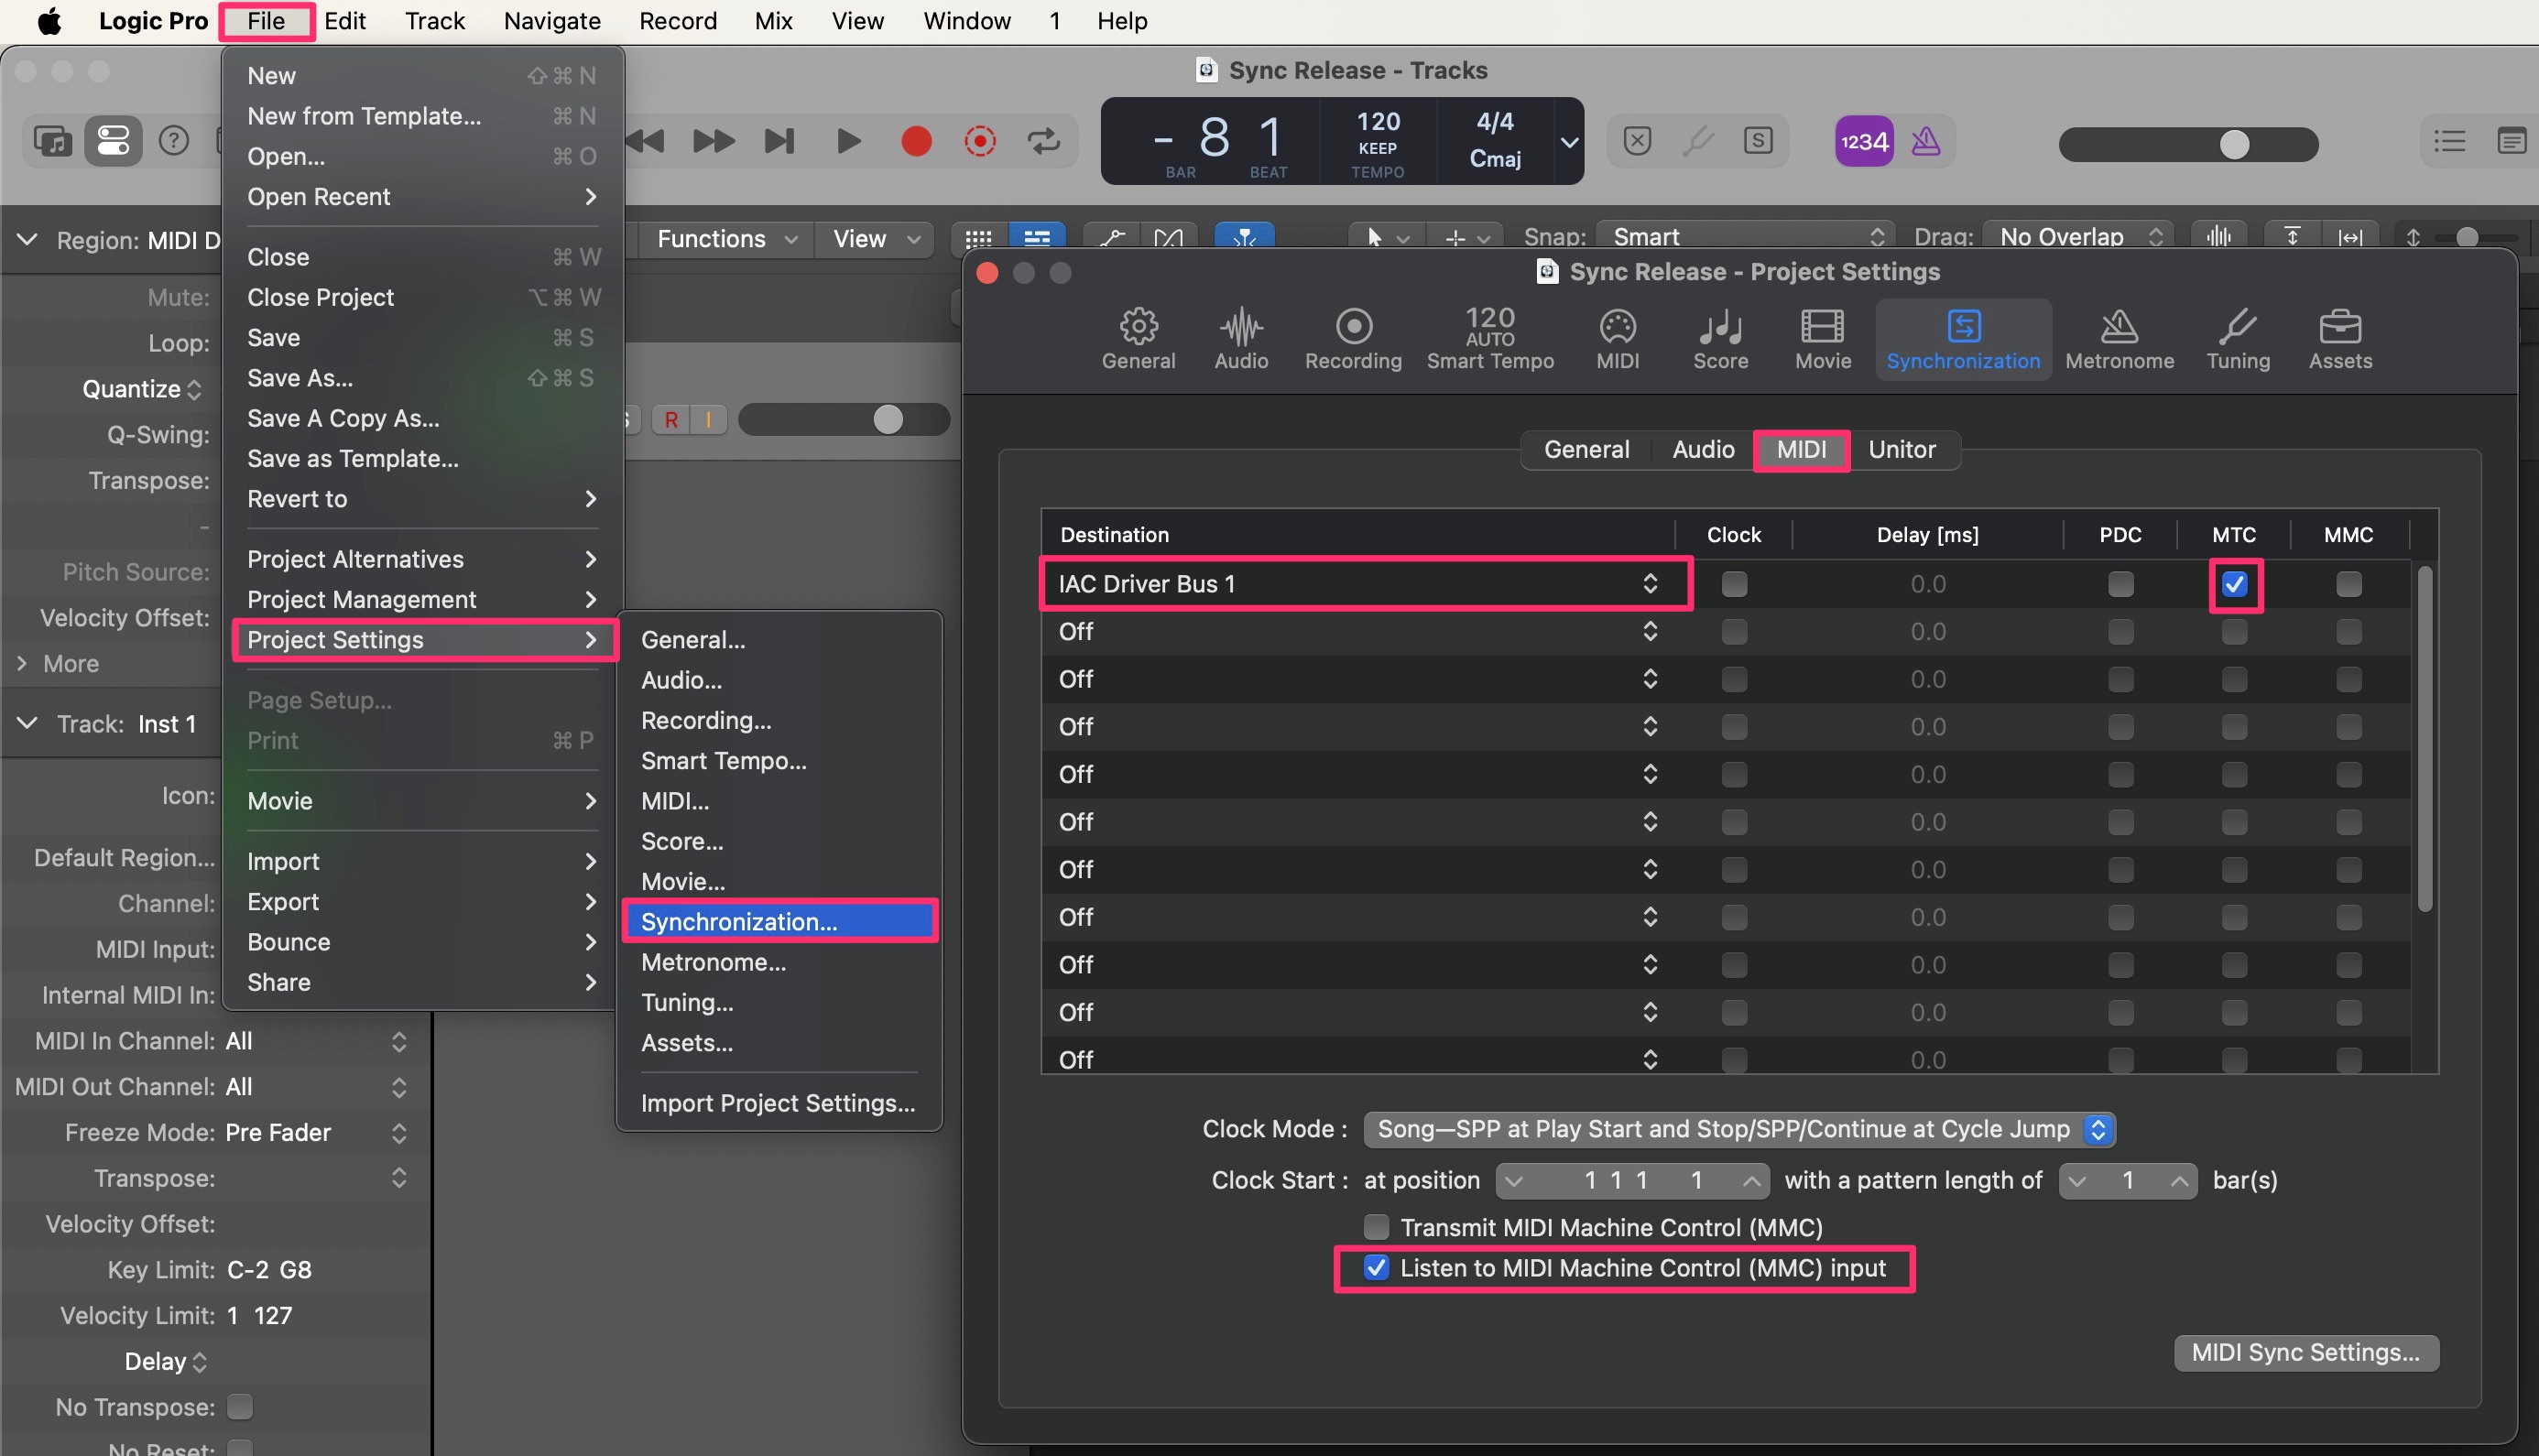
IMPORTANT: As these are PROJECT SETTINGS, you need to change this in every project you'd like to use MIDI Synchronisation for Video Pro.
You may want to include it in your Starter Template.
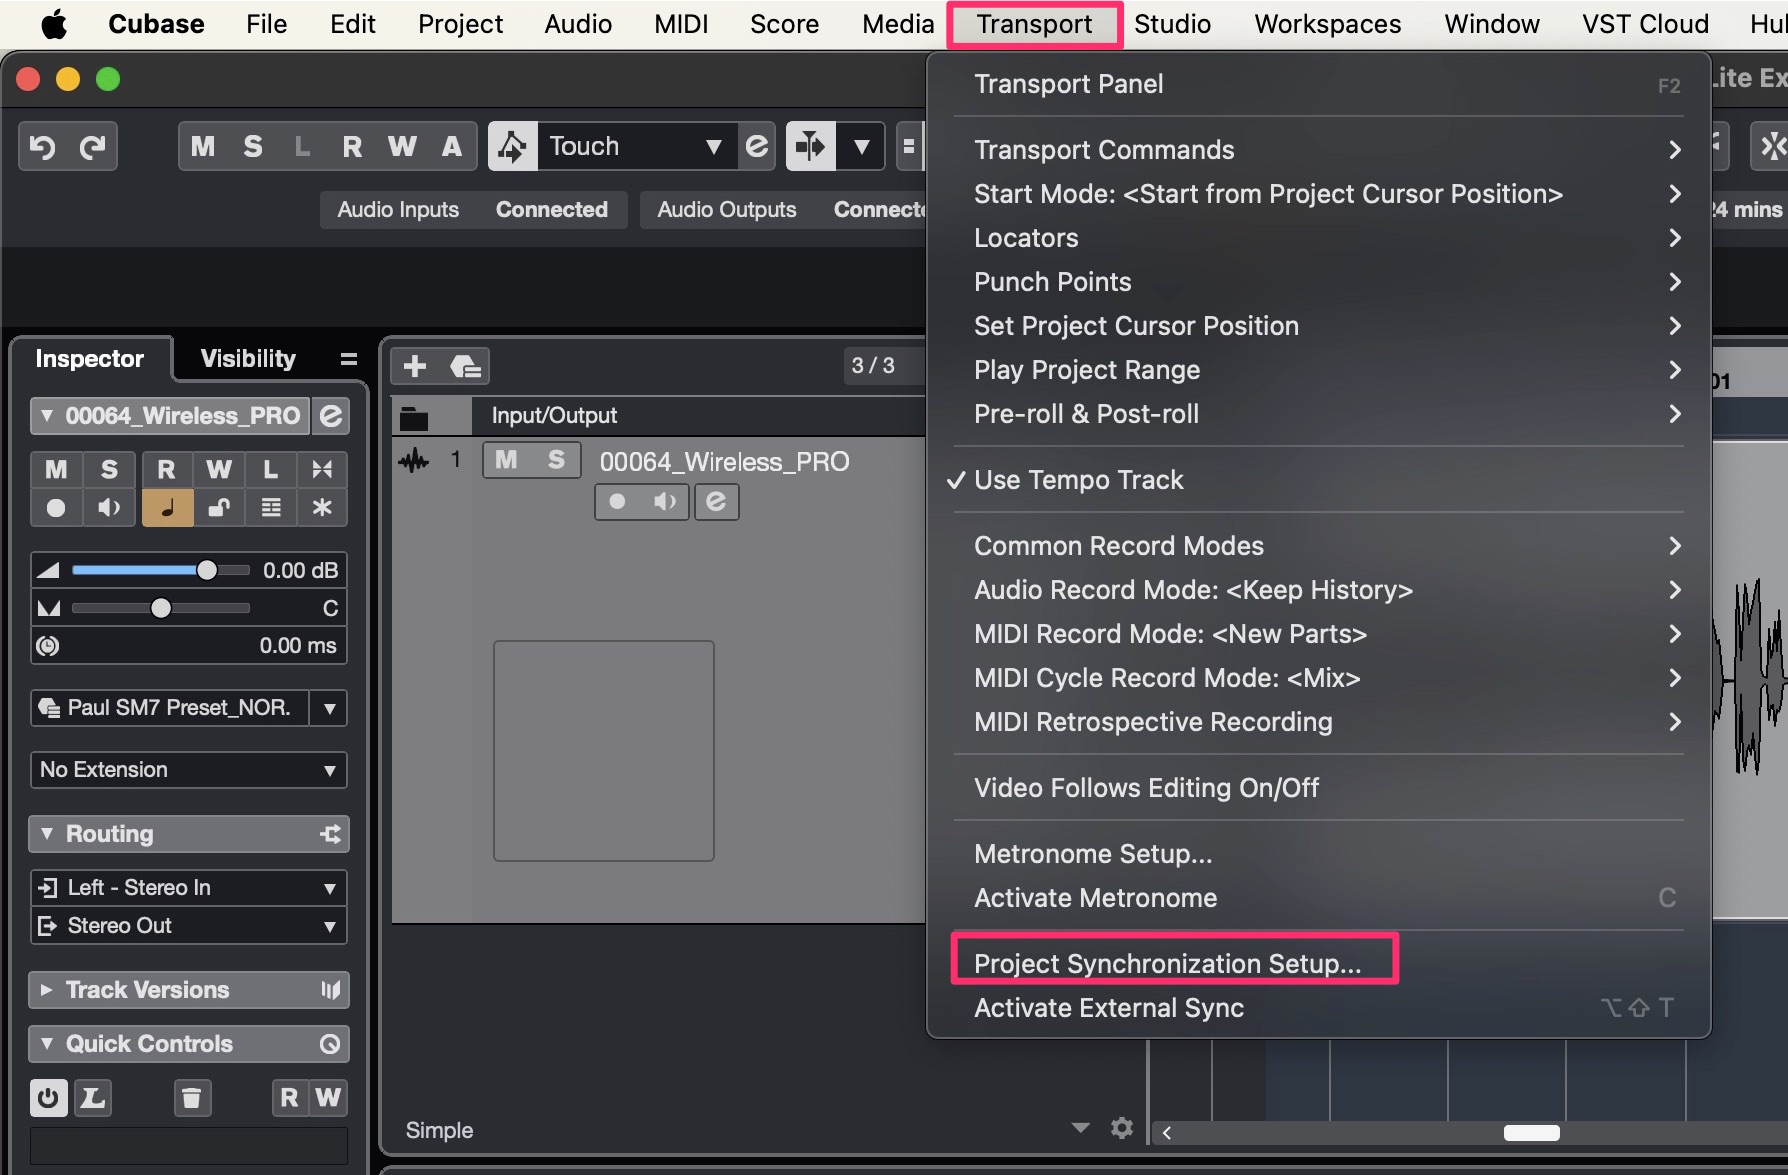
In Cubase, select Project Synchronization Setup under Transport.
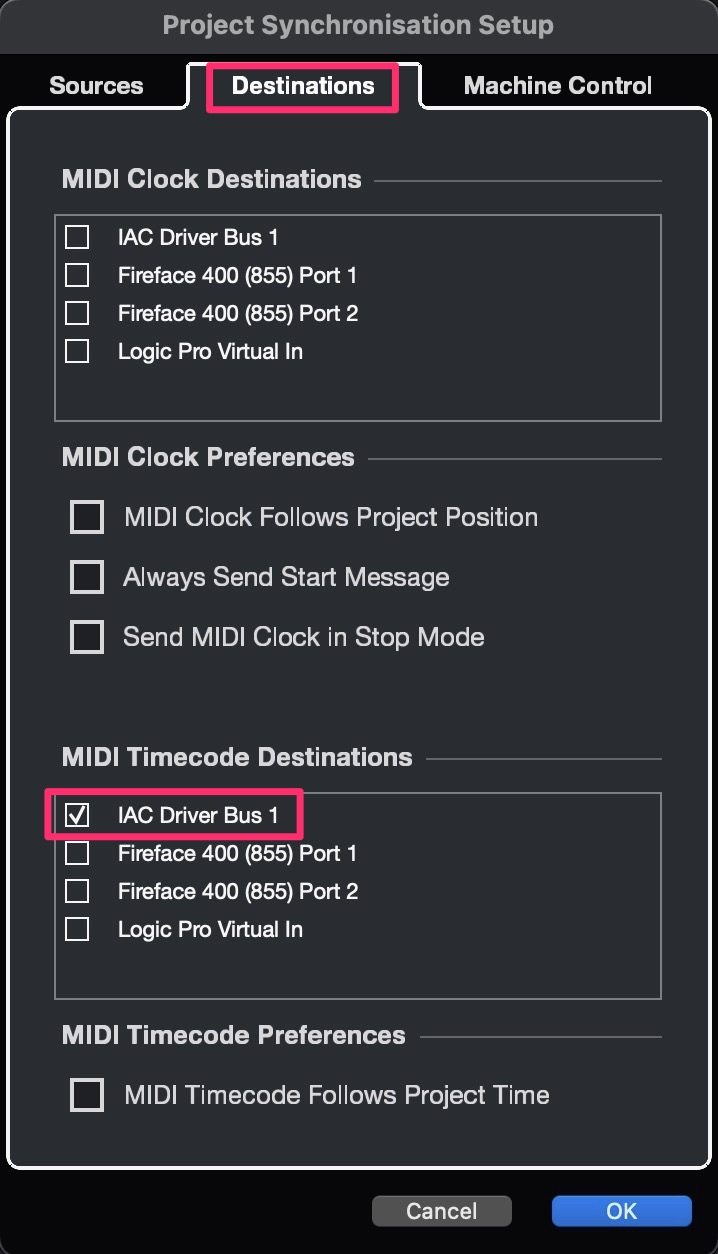
In Cubase's Project Synchronisation Setup, under Destinations, make sure that your MIDI port is activated under MIDI Timecode Destinations.
Next, select Machine Control and activate MMC Slave Active (MIDI Machine Control) and set the MIDI Input to your MIDI port.
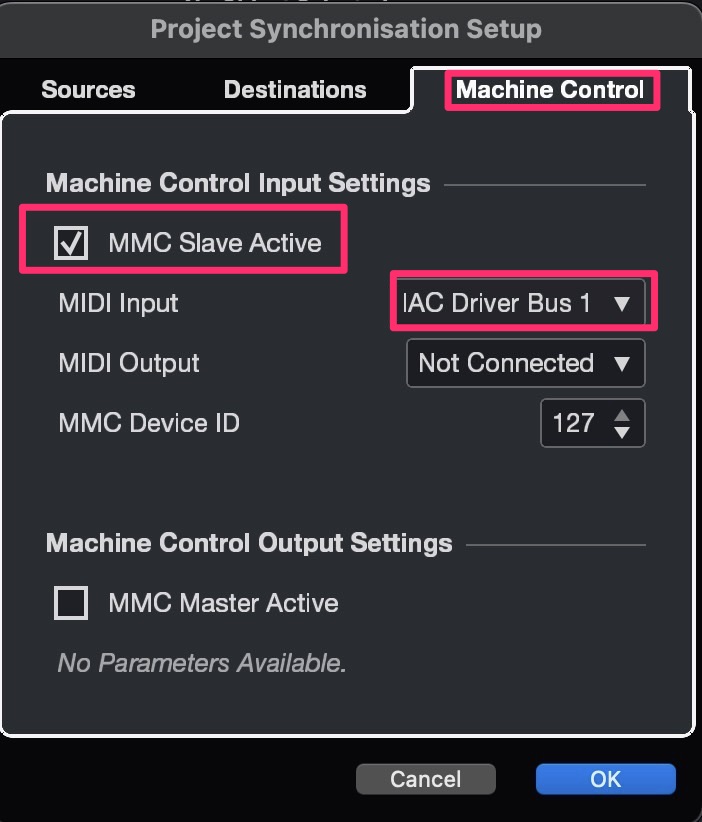
IMPORTANT: As these are PROJECT SETTINGS, you need to change this in every project you'd like to use MIDI Synchronisation for Video Pro.
You may want to include it in your Starter Template.
In Pro Tools, select Peripherals under Setup. In the Synchronization tab, select your MIDI Port as the MTC Generator Port.

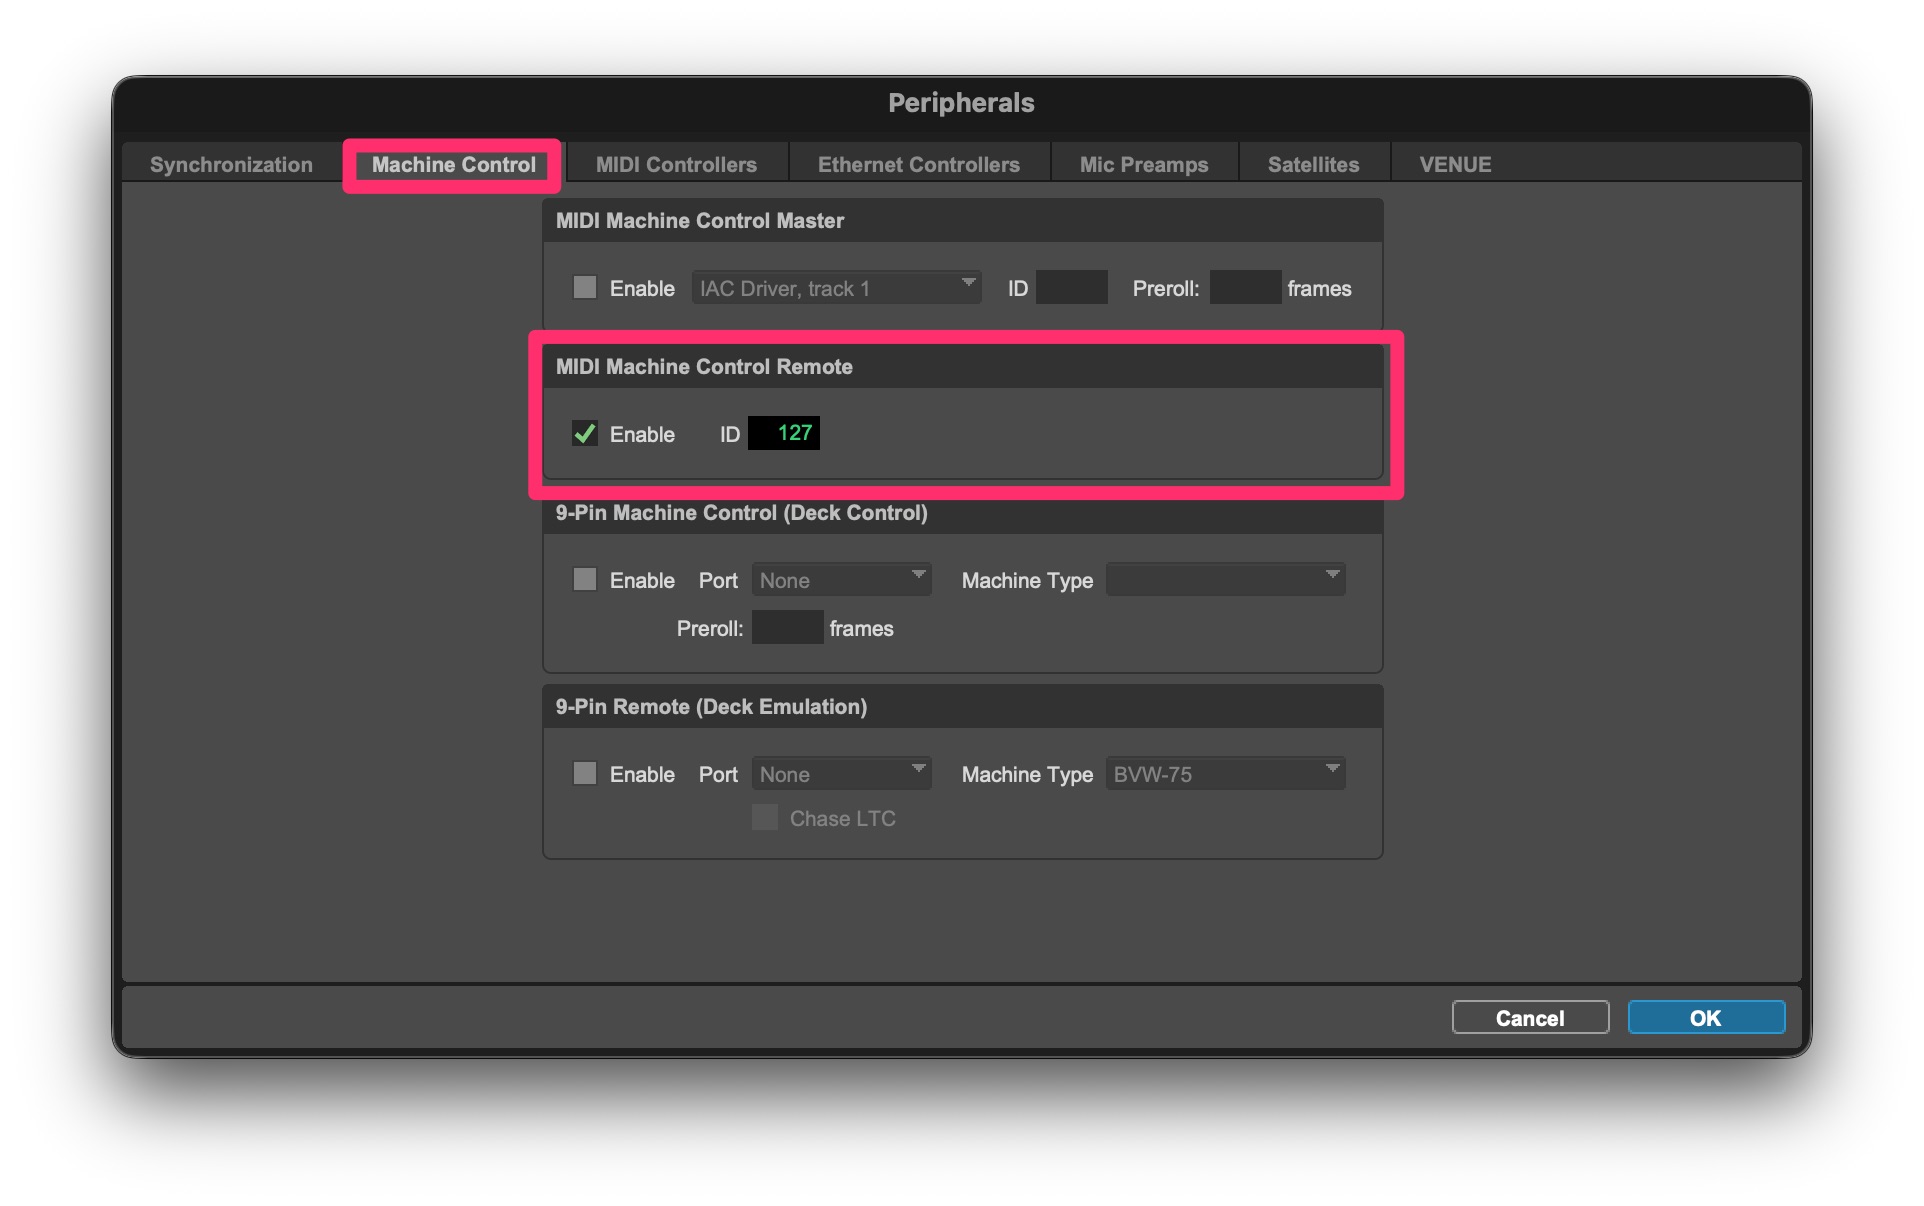
Next, select the Machine Control tab and enable MIDI Machine Control Remote.
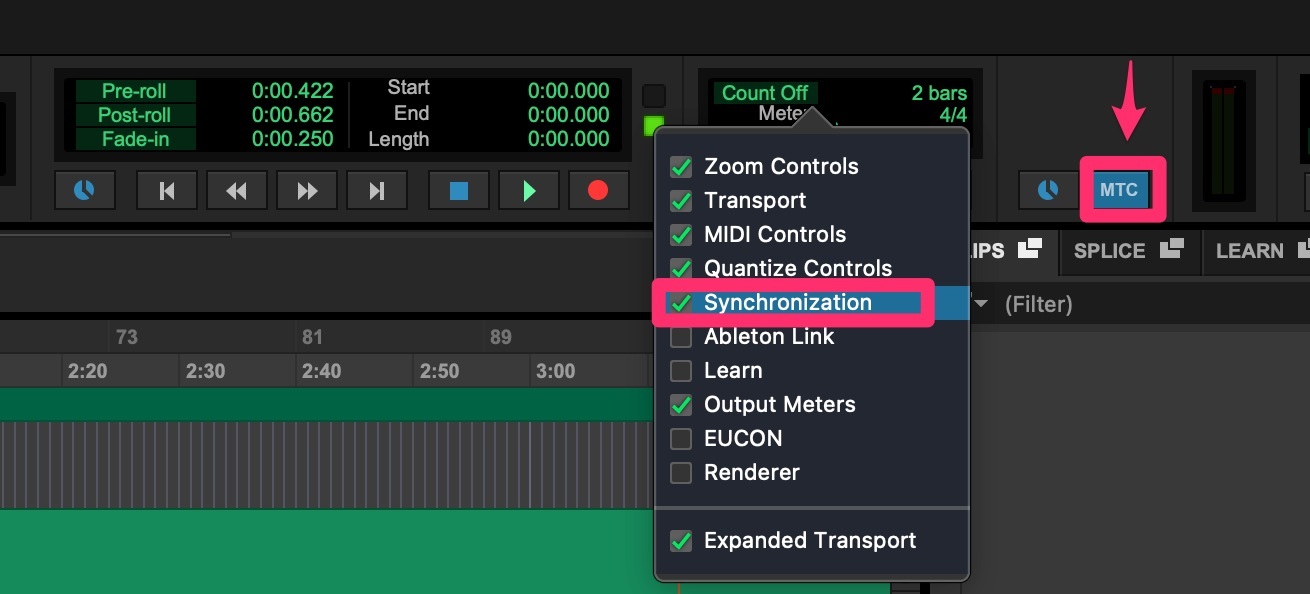
To start generating MTC, click the MTC button (it turns blue). If you don't see it, right-click on the top bar and ensure Synchronization is visible.
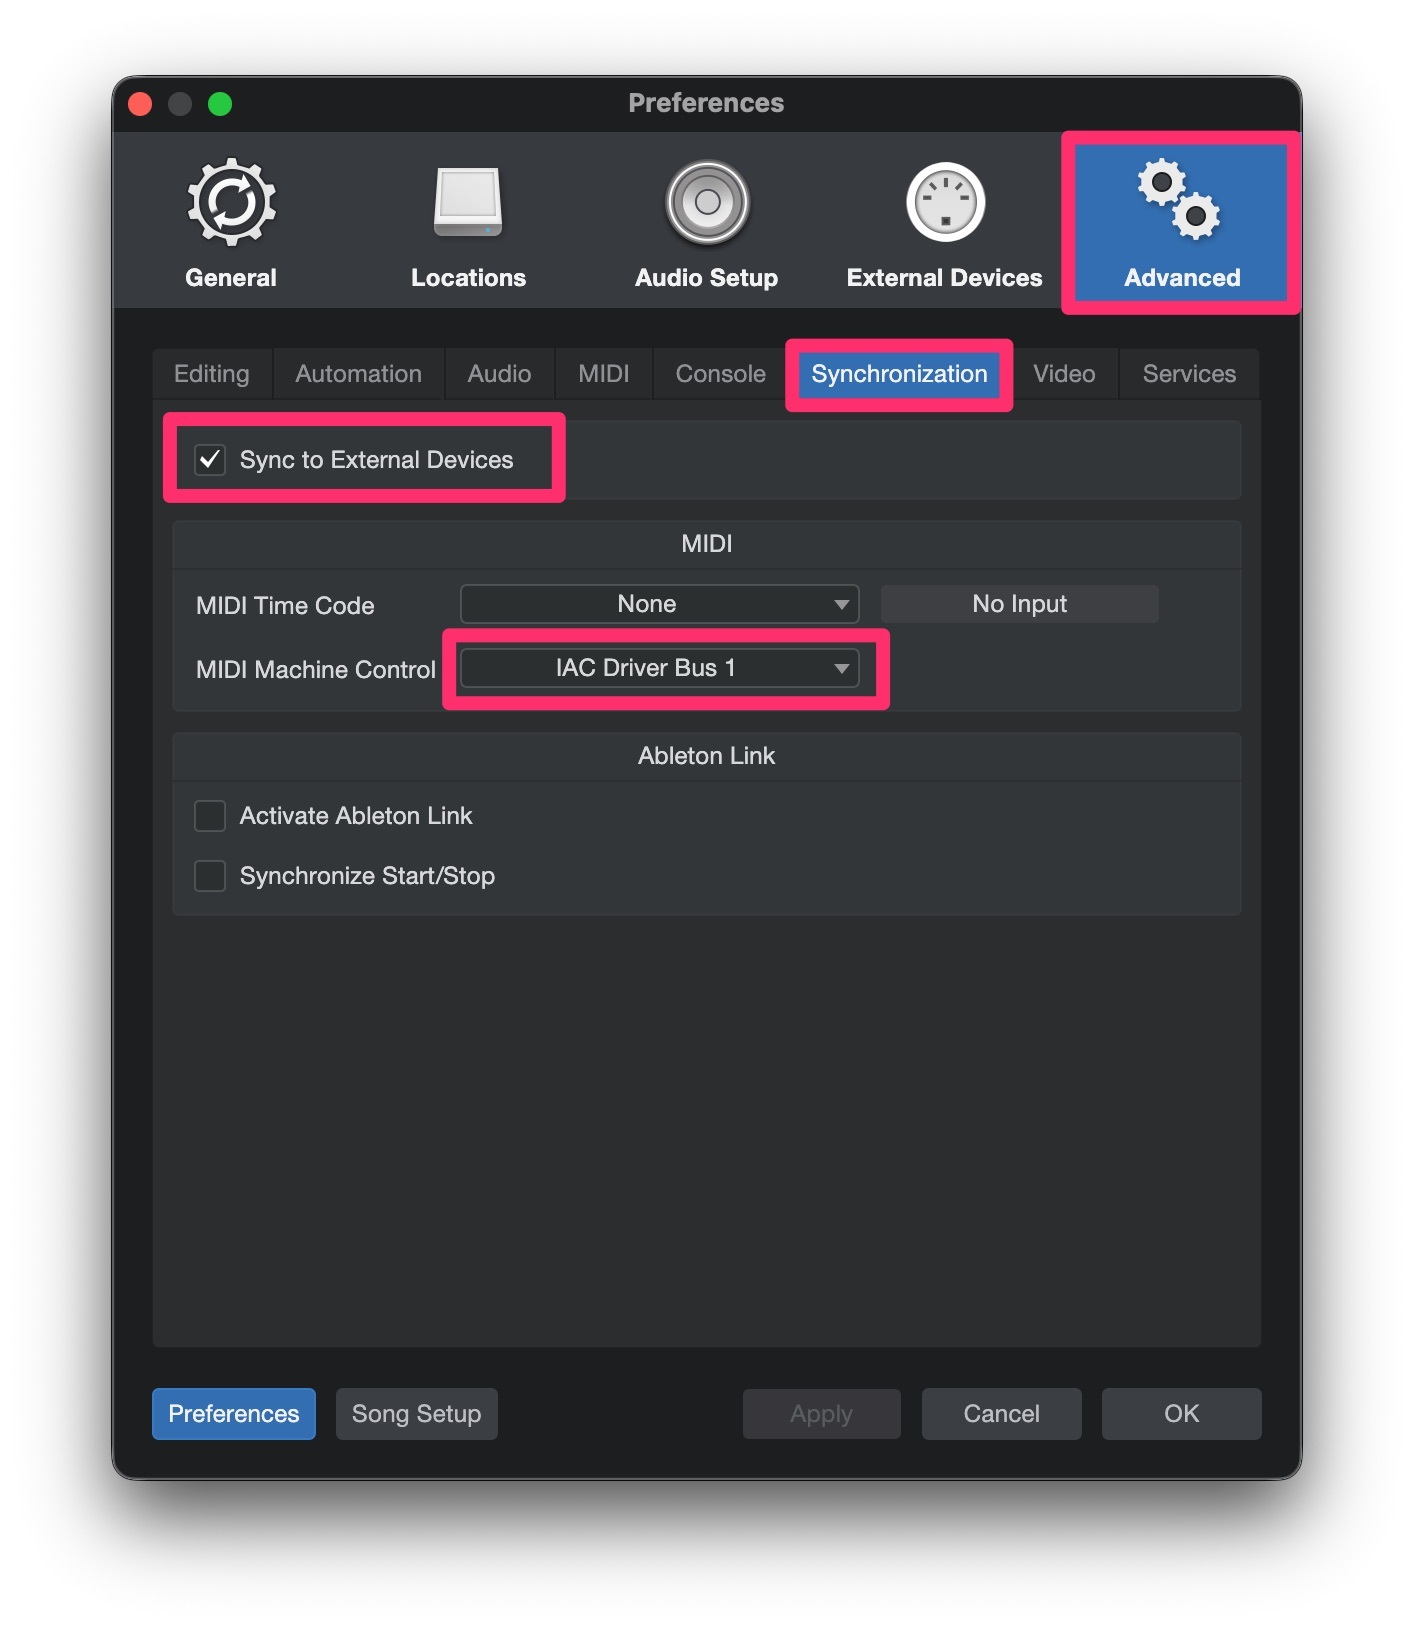
In Studio One, go to Preferences and select the External Devices tab, and click the Add button.
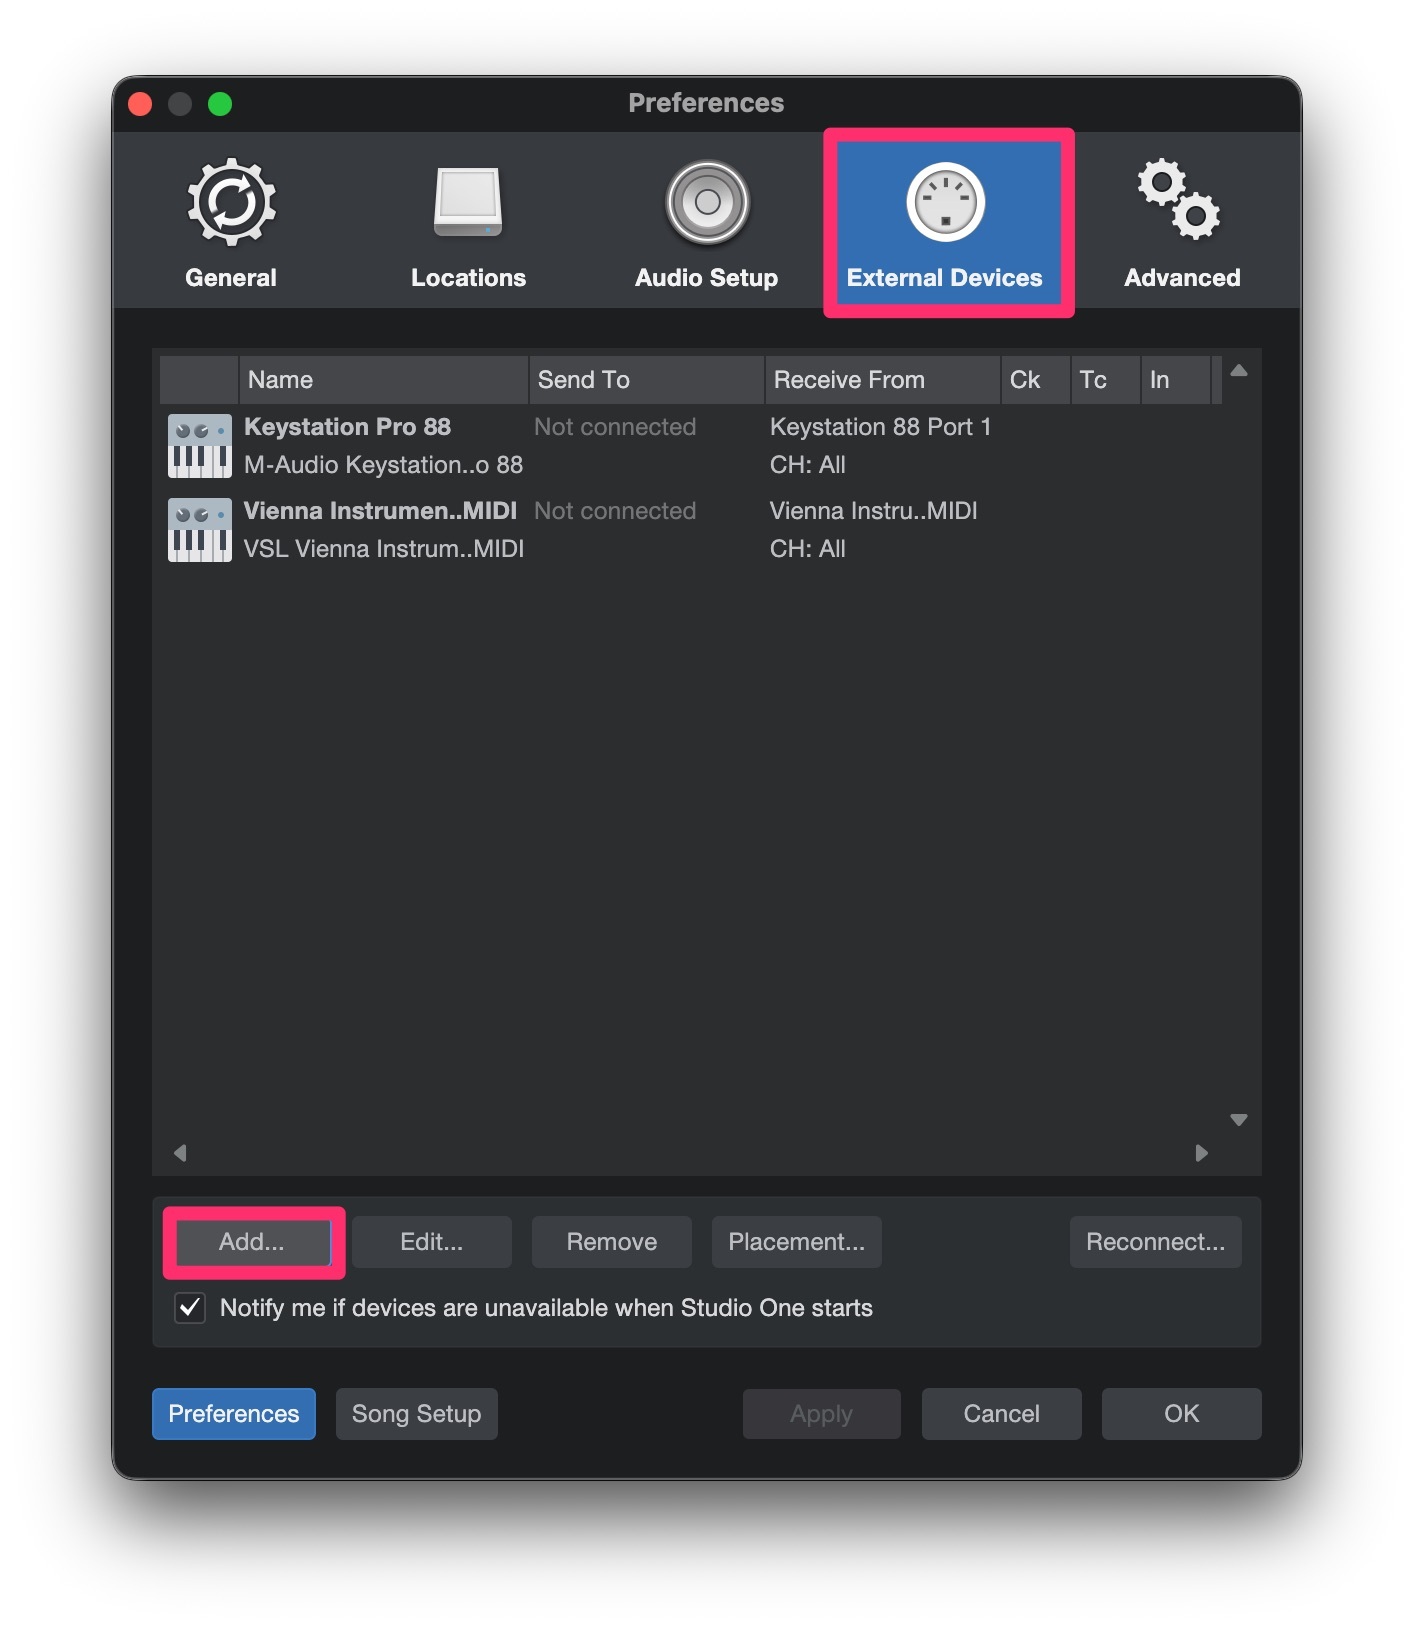
A new window will open. Select New Control Surface and set the Send To to your MIDI port. At the bottom, enable the Send MIDI Timecode.

To enable MMC, return to Preferences and select the Advanced tab. Under the Synchronization, enable Sync to External Devices and set your MIDI port as the MIDI Machine Control.